NATS3 and NATS4 both offer the option to have specific cascades only be displayed at certain times of the day, which can be set by Timed Cascade Rules.
NATS4
To set up a Timed Cascade rule in NATS4, go to the Billers Admin, configure your cascades to your liking, and click the Edit Cascade Rules icon.
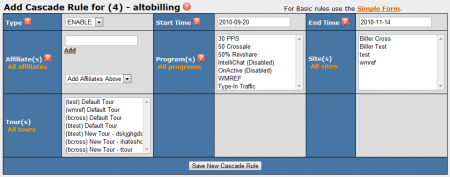
On the "Edit Cascade Rule" page, click the "Advanced Form Link" next to the "Add Cascade Rule" section to edit your rule's time-based parameters (Start Time and End Time).
In the Advanced Form fields, you can use ENABLE (Show) rules and DISABLE (Hide) rules to only display this cascade during a specific time period. For example, you can offer a specific cascade only from July 10th to August 10th by entering 2010-07-10 in the "Start Time" field and entering 2010-08-10 in the "End Time" field. Enter a freeform date or time in the Start Time and End Time fields to define the start and end times for your Timed Cascade(s). When you are finished configuring your new rule, click Save New Cascade Rule to create/finish editing it.
Note: If a disable rule and an enable rule exist at the same time, the disable rule will take precedence over the enable rule.
NATS3
If you are using NATS3, you can use the following PHP Code to implement a Timed Cascade Rule. This code will return a different cascade shortname at different times of the day, allowing you to switch between different Timed Cascades.
To use it, install the code in your Smarty plugins directory, create or enable two Hidden Cascades, set the $defaultCascadeName and $specialCascadeName to the shortnames of your two hidden cascades, and Manually add a cascade to your join form.
Use this Smarty function to set the value parameter in your cascade form. For example:
<input type="radio" name="cascade" checked="checked" value="{smarty_function_output_this_hours_cascade_name}"} />
Code
<?php
/* change the cascade based on hour of the day */
/* For more details, please see http://wiki.toomuchmedia.com/index.php/Timed_Cascade_Rules
/* NOTE : this does not check whether or not your cascades are setup properly */
/* USE AT YOUR OWN RISK -- NO WARRANTY PROVIDED */
function smarty_function_output_this_hours_cascade_name() {

    $startHour = 10;
    $endHour = 13;

    $defaultCascadeName = 'default';
    $specialCascadeName = 'default2';

    $currentTime = localtime( mktime() , 1);
    return $currentTime['tm_hour'] >= $startHour && $currentTime['tm_hour'] < $endHour ? $specialCascadeName : $defaultCascadeName;
}
?>
Credits
- Special thanks to Nick Hahn for assistance with this article.
