Creating and Editing PayVia Options and Dump Formats
NATS gives you the option to create your own Pay Via Types for use with compatible payment options. This allows you to choose different methods of sending affiliate payouts, as well as the option of configuring PayVia options how you want.
Creating A PayVia Type
To create a new PayVia type, go to the payments admin and click the "PayVia Types" tab at the top of the page. On the next page, scroll down to the bottom, enter a name into the "New PayVia Option" text box at the bottom, and click "Add".
You will then be prompted to fill out a set of required fields:
- Pay Via Type- The name of your new PayVia type.
- Description- The description of the PayVia type that your affiliates will see.
- Minimum Payout- A comma-separated list of available payout options that affiliates can select from.
- Cost/Bonus Per Payout- Allows you to set a fee to charge affiliates per payout sent, or add a bonus to affiliate payouts. You can set it to zero to disable any costs, set it to positive to charge affiliates, or set it to negative to give affiliates a bonus on each payout.
- Dump Format- Choose an appropriate dump format to use. For more information, please see the Pay Via Dump Formats section of this article.
After configuring all available fields, click Save to save your changes.
Editing Pay Via Fields
To edit the fields of your new PayVia option, click the "Configure Type" icon under the Actions column. The next page allows you to edit the PayVia type's structure, as well as available fields. You can add a new field to the structure by filling out a new row and clicking Save.
- Name: The name of the field as shown to affiliates (ex: ePassporte ID, user ID, etc.)
- Type: Choose to display a text box or a multiple choice selection
- Required: Whether or not the field is a required field (ex: for the ePassporte ID, if it's not required, how would you pay them?)
- Minimum: The minimum character length for the field (ex: 1)
- Maximum: The maximum character length of the field (ex: 16)
- Unique: Prevents multiple affiliates from using the same value for this field
- Check Function: Validates input using this function. Use NONE to disable validation. (ex: alnum_space_check makes sure the input is alphanumeric characters and allows spaces.)
The four Action icons next to a field let you edit, disable/enable, or change the order the options appear on the affiliate's sign-up form.
Pay Via Dump Formats
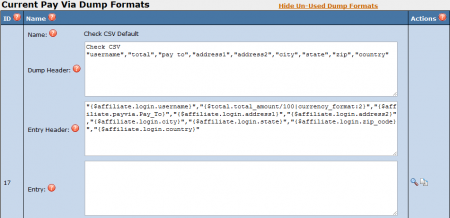
Dump formats are used to format and display your payment after they've been stored. To view your dump formats, go to Payments Admin and click the "Dump Formats" tab to view the current available dump formats.
You can create a dump format by typing in the name under "New Dump Format". Dump formats have the following sections:
- Name: the name of the dump format
- Dump Header: What fields are displayed at the top/beginning of a dump.
- Entry Header: This is displayed before the affiliate's payment.
- Entry: This is the affiliate's payment data.
- Entry Footer: This is displayed after the affiliate's payment.
- Dump Footer: This is displayed at the very end of the dump.
All the fields that you created in the PayVia form are available here, but with different names. Starting with the name you gave the field, the name is:
- prefixed with "$affiliate.payvia."
- all spaces are changed to underscores
For example, the "User ID" field becomes {$affiliate.payvia.User_ID}.
The easiest way to create your own dump format is to duplicate a similar format and then make the necessary changes. NATS4 currently ships with more than 20 formats, so finding a similar format should be easy.
See Also
- Payment Dump Entry Numbers -- Adding entry numbers to your payment dumps


