Note: This article only applies to NATS version 4.1 and higher. If you wish to upgrade your installation of NATS in order to take advantage of this feature, please put in a support ticket.
Campaigns are a feature in NATS that allows affiliates to group and organize incoming traffic statistics, allowing for more specific tracking of promotions and programs. These campaigns, made up by individual traffic tags as of NATS4.1, create unique linkcodes, which allow you to separate and categorize statistics generated by surfers referred through that linkcode only.
You can use traffic tags to split up your affiliate campaigns into separate keywords, which allows for much more flexibility in managing and tracking affiliate promotions than before.
This makes it possible to analyze web traffic that comes from different sources by uniquely tagging certain links and content. Affiliates can also use traffic tags to prevent their campaign statistics from getting cluttered and hard to analyze.
Creating Campaigns
Before you can sort your affiliate statistics, you must first create the appropriate traffic tags. This can be done through the Linkcodes page, under the "Ad Tools" pop-down menu at the top of the page. Just mouse over "Ad Tools" and click the "Linkcodes" link.
You can also create a new campaign to categorize your referral statistics with on the affiliate "Campaigns" page, which can also be found in the "Ad Tools" pop-down menu, found in the toolbar at the top of the page.
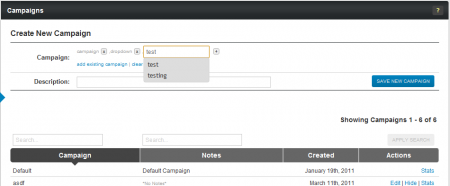
In the "Campaigns" table on the next page, you will see a section marked "Create New Campaign," where you can create new traffic tags, or add existing traffic tags in order to create a new affiliate campaign.

Enter a desired traffic tag for your new campaign in the "Campaign" field and click the plus (+) sign to the right. You can add as many traffic tags as you want to your new campaign here.
For example, you can create a campaign for image banner promotions with the banner, top, and blog to mark that your referrals are coming from an image banner located at the top of a blog you are using to promote your sites. Later, you can sort through your referrals to see how successful your banner promotions were, how successful your top promotions were, and how successful your blog promotions were.
Click "Apply Changes" once you have added your desired traffic tags, and your new campaign will be saved.
You can also do this through the Affiliate Linkcodes page, or any of the Affiliate Adtools pages. This involves the same process as creating campaigns on the "Campaigns" page. For more information this process, please see our Affiliate Linkcode Settings wiki article.

Modifying Campaigns
NATS4.1 also provides the ability to mix and match sets of multiple traffic tags for your campaign(s). This allows referred member traffic to be categorized in multiple ways, allowing for flexibility in recording and reporting statistics. For example, you can take a preexisting campaign and add a new traffic tag in order to slightly modify it and create a new statistics report for that campaign.
To do so, simply add the traffic tags you want to create for your new campaign. You can manually add additional traffic tags by typing in your desired traffic tag name in the "Campaign" field, and clicking the corresponding plus (+) sign next to it. Partially filling in the name of an existing traffic tag in this field will bring up a pop-down menu of all traffic tags that begin with the characters you input into the "Campaign" field. For example, typing the letter "t" into the "Campaign" field will bring up your traffic tags that begin with that letter.
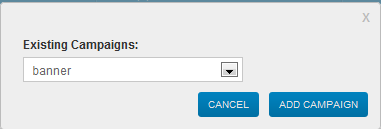
You can also add traffic tags from an already existing campaign by using the "Add Existing Campaign" link, found below the "Campaign" field on this page. Click the provided link to bring up an "Existing Campaigns" drop-down menu, where you can select any campaign you have already created. Choose the campaign you wish to add from the drop-down menu, and click "Add Campaign." You can add as many different traffic tags as you with to a campaign.
Removing tags from the campaign you are creating is a simple operation. To remove individual traffic tags, simply click the minus (-) sign next to the traffic tag you wish to remove from your list. You can also remove all of your set traffic tags with the "Clear All Traffic Tags" link below the "Campaign" field.
You can add as many different tags as you wish to a Campaign in NATS4.1. Once you have added all of your desired traffic tags to your new campaign, add a brief description for your new campaign with the "Description" field below the "Campaign" field. Once you have defined all of the available fields in this section, click "Save New Campaign" to create your new campaign.
Managing Your Campaigns
You can also manage all your currently existing campaigns on the NATS4.1 “Campaigns” page -- simply hover your mouse cursor over "My Accounts" in the top toolbar, and click "Campaigns."
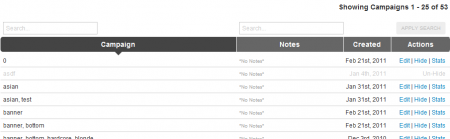
The “Campaigns” table on this page contains essential information for your campaign and traffic tags, and also lets you perform various actions on them with the provided “Actions” links. The actions you can take on this page include:
- Edit - Change the description (notes) of any campaign listed on this page.
- Hide - Remove all stats generated under that campaign from your statistics reports. This allows you to analyze how much of an impact that campaign is making on your overall statistics.
- Stats - View a statistics report for referrals generated under a specific campaign. This lets you view and analyze that campaign's performance separately from the rest of your affiliate statistics.
In this table, you will find the name, user-created notes/descriptions, and the creation date of each campaign in your NATS install. You can search for specific Campaigns by using the search boxes at the top -- this feature allows you to search by either the name or description of a campaign. Simply fill in the parameters you want to search your campaigns with, and click “Apply Search” to narrow down your displayed campaigns.


