The Geo Banners Adtool type allows you to add custom text to an image banner through an automated process in NATS, providing an easy way to customize banners for different affiliates and surfers.

In addition to allowing for custom text, Geo Banners can also take certain Smarty variables, allowing you to automatically tailor your banner ads to information acquired from your affiliate or surfer. For information, please see the Custom Variables section below.
Uploading a Geo Banner Image
You can upload a new image to be used as a Geo Banner through the Adtools Admin. Simply go to the Adtools Admin and click the "View Adtools" action icon next to the "Geo Banners" adtool type.
On the next page, you will see a section labeled "New Geo Banners Adtool." Use the available "Click to Browse for Image" link to upload the image file you wish to use for your new geo banner.
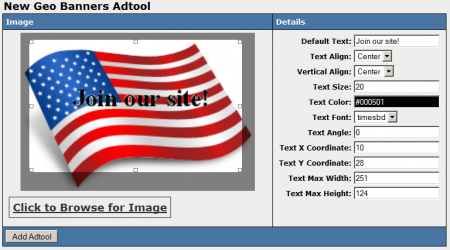
Once you have selected an image to use as your new geo banner, you can decide what text you want to add to the banner with the "Details" settings under the "New Geo Banners Adtool" section. Here, you can define the following settings:
- Default Text - Input the text you want to be displayed on your geo banner. This field also accepts certain Smarty variables.
- Text Align - Choose if you want the text to be aligned to the left, center, or right.
- Vertical Align - Choose if you want your text to be at the top, center, or bottom of the banner.
- Text Size - Input your desired font size for banner text here.
- Text Color - Clicking the available field will bring up a color wheel, where you can select your desired font color.
- Text Font - Choose your desired font for the geo banner.
- Text Angle - Allows you to skew your banner text at a selected angle.
- Text X Coordinate - Input the horizontal coordinates for your banner text.
- Text Y Coordinate - Input the vertical coordinates for your banner text.
- Text Max Width - Choose the maximum pixel width you want your banner to be displayed at.
- Text Max Height - Choose the maximum pixel height you want your banner to be displayed at.
Once you have defined all of the available fields, click "Add Adtool" to add your new Geo Banner to NATS.
Displaying a Geo Banner
Before you can include your new Geo Banner on one of your sites, you must first add a "SHOW" rule. To do so, click on the "Add a new rule" action icon next to your new geo banner. On the next page, simply add a "SHOW" rule type for the affiliate(s), program(s), and site(s) you want this banner to be enabled for. You can also choose to enable this banner for all affiliates, programs, and sites. For more information on rules in NATS4, please see our NATS4 Rules wiki article.

Once you create a "SHOW" rule for your new geo banner, affiliates will be able to grab the linkcode for that banner through their Ad Tools page.
Custom Variables
NATS4 allows for certain Smarty custom variables to be used when adding text to Geo Banners. This allows for customized text in your banner, depending on the surfer or affiliate's location. You can output a surfer's country name, city name, area code, postal code, etc.
Supported Smarty variables include:
$smarty->assign('country_code', $countrycode);
$smarty->assign('country_name', apache_note("GEOIP_COUNTRY_NAME"));
$smarty->assign('city_name', apache_note("GEOIP_CITY"));
$smarty->assign('region', apache_note("GEOIP_REGION"));
$smarty->assign('metro_code', apache_note("GEOIP_DMA_CODE"));
$smarty->assign('area_code', apache_note("GEOIP_AREA_CODE"));
$smarty->assign('latitude', apache_note("GEOIP_LATITUDE"));
$smarty->assign('longitude', apache_note("GEOIP_LONGITUDE"));
$smarty->assign('postal_code', apache_note("GEOIP_POSTAL_CODE"));
The above examples define your Smarty variables, such as $country_code, $country_name, $postal_code, etc.
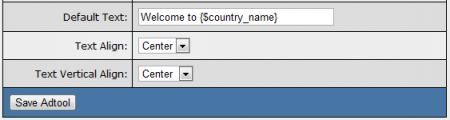
To output values for the surfers' locations, enter the necessary Smarty code in the "Default Text" field, found when editing a geo banner in the Adtools Admin.
For example:
Welcome to {$country_name}Find other people in ($city_name}!


