Note: Third-parties do not notify NATS about new sales and sign-ups immediately -- there may be up to a 24-hour delay before NATS records third-party transactions.
NATS4 offers Video Secrets integration through the Third Party Admin. Third Parties are sites that provide additional content to your members for an additional fee. Adding Video Secrets functionality to NATS is a 4-step process, which uses other admins as well.
Third Party Admin
To begin adding XOnDemand compatibility to your NATS install, you must first configure in through the Third Party Admin. Go to the Third Party Admin, scroll down to the "Setup New Third Party Partner" drop-down menu, select "XOnDemand", and click Add. After you have added XOnDemand to your list of third parties, click the "Edit Account Info" action icon. When prompted, fill in the XOD Webmaster ID that you received from XOnDemand.

When you are done configuring these options, click Save.
Next, click on the "Set Third Party Fees" action icon to set your XOnDemand transaction charges and deduction fees, as well as where/when you want those fees to be deducted from. You can choose to deduct fees after affiliate payouts, from the affiliate payouts, or before affiliate payouts. Once you have configured these options, click Add.
Sites Admin
The next step to configuring XOnDemand is to add it to the Sites Admin. To do so, go to the sites admin and click the "Add a Site" tab at the top of the page.
On the next page, set your site type to "3rd Party" and give it a site name, a shortname, and set your site's launch date. Once you have done this, click the Save Changes button and navigate back to your Site List.
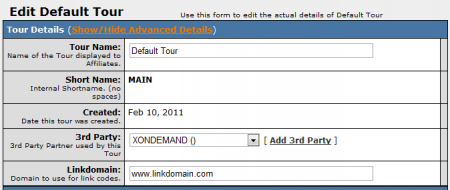
Next, find your new (XOnDemand) site and click the Edit button to configure a tour for your new site. Under "3rd Party," select XONDEMAND from the provided drop-down menu. Enter your new site's linkdomain and enter your XONDEMAND URL under the "Third Party Partner Details" section of the page.

When you have completed the above steps, you will be free to configure the other available settings for your site and tour. Once you are done configuring your required fields, click Save Changes.
Programs Admin
To continue configuring XOnDemand as a third party provider in NATS, go to the Programs Admin and create a new disabled program.
Note: You can also create a new enabled program, but we recommend you create a disabled program, as new affiliates will not be automatically enrolled in this program. When you're ready for your affiliates to send traffic through this program, you can enable it to automatically enroll all affiliates in the program.
Fill in the necessary information and choose the Standard Program option under the "Program Type" drop-down menu, then click Add Program.
On the next page, select your XOnDemand site from the drop-down list of Site Tours, or choose your XOnDemand tour from your list of tours, and click Add. Once you add your tour, click the pencil icon under Program Default payouts to edit your payout options for this program. Enter your desired payout amounts or percentages, then click the Save button to save your new program.

Type-in Traffic
After you have finished configuring your site and program, you will be able to get an affiliate link code for your type-in/in-house affiliate account. Once you have gotten the NATS code from that link code, go back to the Third Party Admin, edit XOnDemand, and paste the affiliate's NATS code into the Default NATS Code field. The affiliate will then receive credit for all type-in traffic sent to XOnDemand. Please see our Getting The NATSCode article for help obtaining your NATSCode, and our In House Accounts article for more information in in-house accounts in NATS.
Note: If you don't complete these steps, NATS will not be able to track XOnDemand type-in traffic.

