NATS4 Site Setup
Basic Site Setup
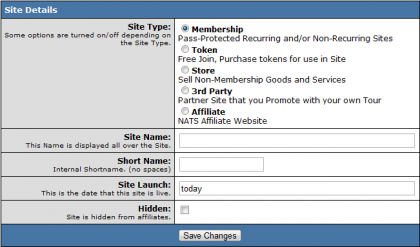
To setup a basic site in NATS, go to the Sites Admin and click the Add a Site tab. Under Site Details, choose the site's type from one of five choices.
- Membership - Password-protected recurring and/or non-recurring sites
- Token - Free to join, must purchase tokens for use in-site
- Store - Used to sell non-membership goods and services
- 3rd Party - A partner site that you promote with your own Tour
- Affiliate - A NATS Affiliate website
Once you have decided what kind of site you want to set up, fill in the site's desired name, shortname, launch date, and whether the site should be hidden from affiliates. Click Save.
After you have done this, go back to your Site List and edit the Default Tour for your site. Fill in your Tour Details, which consist of Tour Name, URL of your tour, and Linkdomain.
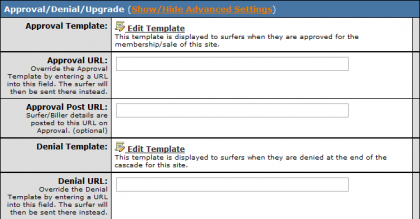
After you have entered the necessary information for your site, enter the approval and denial URLs by showing the advanced settings for the Approval/Denial/Upgrade options. If you don't enter these URLs, NATS will assume you want all traffic leaving the biller's page to go to this tour's default approval and denial templates.
Note: the default approval and denial templates are blank; you can edit them by clicking the Edit Template button next to Approval and Denial Template instructions on the Edit Tour page.
Biller Details
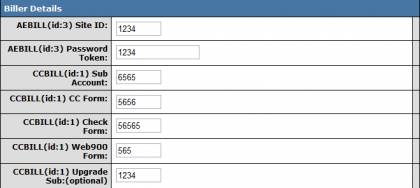
Once you have configured the necessary URLs, scroll down to the Biller Details section. Here you can fill your biller information or see the individual Biller Instructions section for details. You can access these by clicking the "show" button next to Biller Instructions on the right side of this article and choosing what biller you want to work with. Any Biller Details that may be entered in these fields must be provided by the biller themselves. Once you have configured your settings, click save changes to save your changes and reload the page.
Join Options
Next, scroll down to Join Options for this Tour and click Setup Additional Options For This Site. Add a new join option by filling in the initial cost and days, the recurring cost and days (optional if your join option doesn't recur), the join form text, and the appropriate Biller codes. After you have filled in these fields, click Save.
Note: See the biller set up instructions for specific biller codes.
Setting Up Tours in Programs Admin
Go to Programs Admin and edit each program you want to use to promote this site. Scroll down to the Tours In This Program section, select the Tour you just created from the drop down, and click Add. Repeat for each program.
Advanced Site Setup
The above instructions are sufficient for getting your site/tours online and functioning. However, NATS4 offers a great deal of settings to further configure your tours.
HTTPS Use
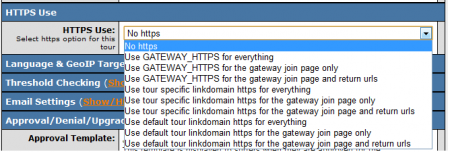
NATS4 offers the use of HTTPS in order to secure your tour. Here, you will be able to choose between using Gateway HTTPS, a tour specific linkdomain HTTPS, or a default tour linkdomain HTTPS for various pages. For more information, please see our NATS4 HTTPS Gateways article.
Language & GeoIP Targeting
The Language & GeoIP Targeting settings allow you to restrict access to your site for surfers from specified countries. NATS4 detects surfer countries through the surfer's default browser language.
You can use the "Allowed Languages" field to list the languages you want to be able to access your site. This is a comma-separated list that can have as many language values as you wish. There are also options to Allow Raw Hits and Allow Unique Hits for languages that are not listed in the Allowed Languages field. For a full list of allowed languages, as well as their Language Codes, please see our Allowed languages article.
The "Alternative URL" field allows you to set a URL to automatically redirect surfers to if they do not meet the specified Allowed Languages criteria. Both of these Configuration Admin settings are optional, and thus not necessary for your site to function.
Threshold Checking
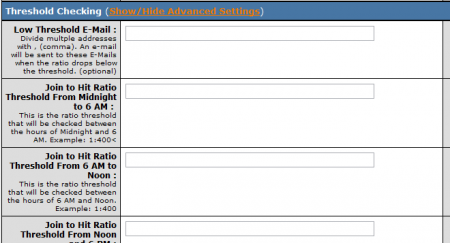
Threshold Checking is a feature in NATS4 that allows the system to automatically send a Low Threshold e-mail whenever a tour's join to hit ratio drops below a specified amount.
In this section, you will be able to set a minimum join to hit ratio for several time periods: Midnight to 6 AM, 6 AM to Noon, Noon to 6 PM, and 6 PM to Midnight.
If you wish to use this option, you must input a "Low Threshold E-Mail" and a "Mail Threshold." A "Low Threshold E-Mail" specifies what e-mail addresses will receive low threshold e-mail warnings, and the "Mail Threshold" specifies the subject of the warning e-mail. You can edit the content of the e-mail itself by clicking the "Edit Template" or "Edit HTML Template" links.
Email Settings
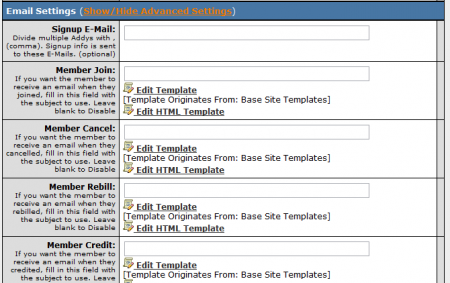
NATS4 Email Settings provide the feature of sending automated e-mails to members when their actions trigger certain conditions. E-mails can be sent when members join, cancel, rebill, credit, chargeback, have insufficient funds, void, change member details, etc. To enable automated e-mails for a certain action, simply fill in the blank field with an e-mail Subject. You can also edit the body of these automated e-mails with the "Edit Template" link or the "Edit HTML Template" link.
E-Mail settings also support a feature to send an e-mail whenever a member joins a site through your tour. To do so, fill in the "Signup E-Mail" field with an e-mail address for this information to be sent to-- usually a program owner or an account representative.
Postback URLs
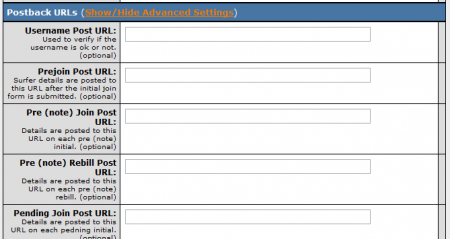
Postback URLs allow you to post information to a URL of your choice when certain biller events are triggered. This includes joins, rebills, credits, chargebacks, etc. You can also use Postback URLs to verify member usernames. For more information on this feature, please see our NATS4 Post URLs Usage article.
User Management
NATS4 allows the use User Management scripts, so you can send a postback script when a username gets added, removed, changed, expired, or checked. This is useful if you are using an external verification script in order to check user details. For more information on this feature, please see our NATS4 Site User Management article.
Members Charged Twice
If you did not set the Approval URL while editing your site in the Sites Admin, your members may be charged twice. After submitting their payment information, the member is supposed to be redirected to the Approval URL -- but if this value is blank, the member's Web browser will reload the payment submission page, potentially processing the member's payment twice.
If your Approval URL is correct and members are still being charged twice, please submit a support ticket.
