Configure Redirects
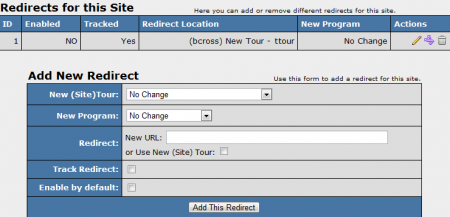
With this page you can add redirects, allowing you to redirect a specific percentage of traffic to a different site, tour, or program. First you need to create your redirect locations, and then choose what will be sent through those redirects.
Tour/Site Redirects
This feature allows you to split test your sites or tours, as you can now set up a site redirect with a specified percentage of traffic.
Adding a Redirect
To set up a redirect, go to the sites admin, find the site or tour you would like to edit, and click the Configure Redirects icon under the Actions column. From here you can choose what tour and program you would like to redirect to, as well as the new URL and tracking options. Click "Add This Redirect" once you are done filling out the required fields.
Once you have configured your new redirect, you will be able to go back and add rules for this redirect. From here, you can configure if the redirect is active, as well as what tours, programs, affiliates, countries, and languages are affected by this redirect.
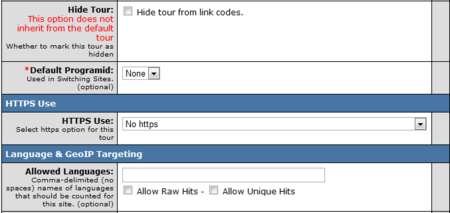
You can also hide your second site or tour (in this case, tour B) from affiliates so they can only grab link codes for the default tour. To do so, go to the sites admin and edit the tour you wish to hide link codes for. Under the "Tour Details" section, check the Hide Tour checkbox to hide that tour's link codes from affiliates.
Once you have done this, you will be left with one affiliate link code that randomly redirects surfers to either your default tour or tour B.
When you have your tours or site redirects set up, you will be able to see the individual stats for each tour or site in the reporting admin. This can help with seeing which of your tours is better at converting referred surfers into members, as well as seeing what surfer/member behaviors are associated more with each tour or site.
Program Redirect
Setting up program redirects is slightly more complicated than site / tour redirects. In this case, NATS will add one entry for each tour and program, and you will need to add rules for each of these entries. For example:
You have site A with two tours: A1 and A2. You have two programs: P1 and P2. You want to redirect all traffic from P1 to P2 for the all tours in site A. This is what you would set in the Add New Redirect table:
- New(Site) Tour: No change.
- New Program: P2.
- Redirect: Click Use New (Site) Tour checkbox.
- Active for: 100% of traffic.
- Track redirect: Check this box if you want to count the traffic going through this redirect.
- Disable Original Hit: Check this box if you want to disable recording a hit on the tour that which is being redirected away from.
- Maintain Query String: Check this box if you want to keep the query string in the url during the redirect.
- Enable by default: Check this box if you want the redirect to begin immediately after you add it (and add rules).
You can now click Add This Redirect and NATS will add one entry for each tour and program. In this example, it will add two entries:
- Redirect1 has A1 as Redirect Location and P2 as the New Program.
- Redirect2 has A2 as Redirect Location and P2 as the New Program.
The next step is to add an enable rule for each redirect, added using the rules icon. Rules govern which tour, program, affiliate, country, and language to which this redirect applies. Following our example:
- Redirect1 should have an enable rule with A1 as the tour, and P1 as the program.
- Redirect2 should have an enable rule with A2 as the tour, and P1 as the program.
So now, all traffic from all tours in site A in P1 will be redirected to P2.

