NATS4 Rules
A new feature in NATS4 is rules. Rules let you dictate things like what events happen when and who sees what. Overall the rules system follows the same general format with a few specific differences depending on what context the rules are being used in. In some cases you must set up rules to perform certain actions. This includes sending out mass email , showing join options , and showing cascades.
Make sure you have at least one rule when you want to perform these actions.
Why Rules?
Rules are there to make NATS a more flexible environment for you and your affiliates. Rules allow you to exercise a great degree of control over the everyday occurrences in your affiliate program. Here are a few examples of where rules can be useful:
- You may want to have a certain billers only used for specific sites in your program. You would set up a rule that would enable a certain cascade for one set of sites and another cascade for the other sites.
- You may want to send an e-mail to all affiliates that have reached some amount of profit earned to congratulate them. The rules in the Mailing Admin will let you specify that you want to send an email to these affiliates that have exceeded this amount.
- You may want to offer different join options to surfers that come in from different countries to account for different currencies. You can specify what countries certain join options will display for.
General Rule Format
Rules always follow the same general format. You can have a rule that is in one of three states. Although they may be called something different i.e. show, enable, send, they all fall into one of the three states. The first state is an enabled state. When a rule is created in an enabled state it will preform a given action when the specified criteria is met. Next is the disabled state. When a rule is created in the disabled state the action will not be preformed based on the specified criteria. The last state is the Ignore state. When in this state a rule will basically act as if it were not created. This can be useful for testing reasons when you want to create a rule but are not sure how you should use it yet.
Rule Relations
A disable rule will always take precedence over an enable rule. For example, say you want a popup to show for all affiliates but affiliates X, Y, and Z. You would want to create a SHOW rule for all affiliates on all sites, tours, etc. But the three that you don't want to have popups you would create a HIDE rule for. This HIDE rule will take precedence over the SHOW rule for everyone else and they will not have popups displayed.
Form Types
There are two types of rule forms that you will come accross, simple and advanced. The simple form will allow basic control over functionality. The advanced form will let you fine tune your rule to specific criteria. The following section will detail the two different type of rule forms.
Simple Form
The simple form for rules allows you basic control over an area of functionality. This includes limitations such as affiliate, program, and tour. In addition there are time based setting that allow you to set the duration that a rule is in effect for.

You can select from the three types of rules: IGNORE, SHOW, and DISABLE:
- IGNORE
- Ignore allows you to set up a rule without having it be an active rule. For example, say you know that there are certain limitations that you want to have enacted as a rule for a given section. You may create an ignore rule while you are still figuring out the details of what you want the rule to encompass. In other words its a non-active rule that has no effects.
- SHOW/ENABLE/SEND
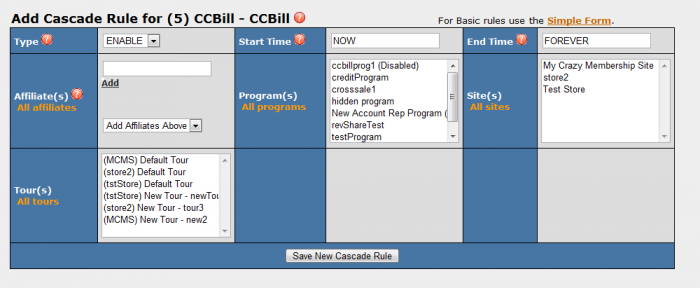
- A show rule will enable the functionality based on the limatations that you specify. The following is an example of a SHOW rule for cascades. (Cascades require a show rule to be seen on a join page. More info in the #Cascades section.)
- A show rule will enable the functionality based on the limatations that you specify. The following is an example of a SHOW rule for cascades. (Cascades require a show rule to be seen on a join page. More info in the #Cascades section.)

Here we are adding a rule for the cascade CCBill that we have created. But I only want to make this payment option available to a affiliates in my program testProgram and for my site My Crazy Membership Site. To do this we select the appropriate program and site from the drop-downs for program and site as shown below.

Now we just click Save Rule and the rule is now set.

This cascade will now only show up for surfers who come in under testProgram on the site My Crazy Membership Site.
- DISABLE/HIDE/HOLD
- A disable rule will have the opposite effect as an enable rule. Using the same example as above, say I want to not display this cascade for surfers who come in under testProgram and on the site My Crazy Membership Site. I would do the same as above but this time I would select Disable from the Type drop-down.
Available Criteria
The follwing is a list of the limiting criteria for the simple form in most cases(Note: This may vary, see section specific information for more details):
- AFFILIATE - Specify here which affiliate that you want this rule to effect. (Note: For than one see the #Advanced Form).
- PROGRAM - Specify here which program that you want this rule to effect.
- SITE - Specify here which site that you want this rule to effect.
- START DATE - Specify here when you want this rule to go into effect. This can be in any free form date style or the keywords TODAY and NOW.
- END DATE - Specify here when you want this rule to expire. This can be in any free form date style or the keywords TOMORROW and FOREVER.
Notes
Under the affiliate section, you can add an affiliate by entering their user name or ALL for all the affiliates. If you want to add more than one affiliate but not all the affiliate, you must click on the Advanced Form link above the Add Cascade Table. Also you can choose the rule for either all the sites or just one site and for either all the program or just one program.
Advanced Form

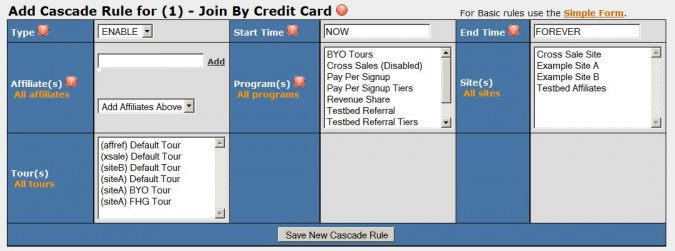
The advanced form expand on the simple form by giving you the ability to add several affiliates, programs, etc., at the same time to one rule. In addition, depending on the context of the rule, it may add additional limitations that can be added. For example, when using the advanced form on the cascade rules, you gain the ability to target a cascade by tour.
Available Criteria
The available criteria is the same as the basic form but gives you list of each field so that you may select more than one. For programs, tours, and sites to select more than one just hold down the CTRL key and click on the ones that you want. For affiliates just type the name of the affiliate that you want and then click the add button.
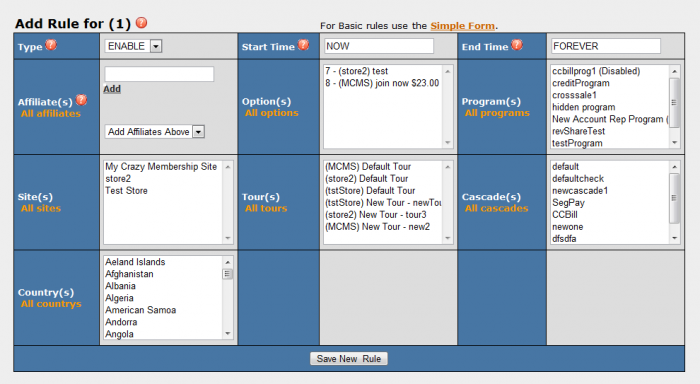
In addition to the basic form fields choosing the advanced for give you additional fields to specify. This may vary depending on the section that you are creating rules for. Two example of common fields that are given in the advanced form are Tour and Country.
Section Specific Description
Cascades
Cascades are one place that you will most definitly be using rules. To display a payment type associated with a cascade you must have an ENABLE rule for it. Without one the cascade will not display. Use the DISABLE rule to disable a cascade for some subset of the ENABLE rule.
Simple Form Criteria

The follwing are the critera available for the cascade rules simple form:
- Type - Can be one of ENABLE/DISABLE/IGNORE. Choose one of the three states that a rule can be.
- Affiliate - Type in the name of the affiliate that you want this rule to effect or type ALL for all affiliates.
- Program - Choose a program from the drop-down that you would like to use this rule for or choose All Program for all.
- Site - Choose a site from the drop-down that you would like to use this rule for or choose All Sites for all.
Advanced Form Criteria

The advanced form for cascade gives you the ability to select muliple entry for all of the above and:
- Tour - Choose a site from the drop-down that you would like to use this rule for or click All Tours.
- Start Time - Sets when the rule will take effect. Enter any freeform date or keyword. For more info on freeform dates please see NATS4 Freeform Date.
- End Time - Sets when the rule will expire. Enter any freeform date or keyword.
Join Options
If you did not select the Active for all Tours check box when you created the join option you are required to give them a SHOW rule for them to be displayed.
Form Criteria
- Type - Can be one of SHOW/HIDE/IGNORE. Choose one of the three states that a rule can be.
- Affiliate - Type in the name of the affiliate that you want this rule to effect or type ALL for all affiliates.
- Program - Choose a program from the drop-down that you would like to use this rule for or choose All Program for all.
- Country - Choose a country to target this rule towards or choose ALL for all countries.
- Biller - Choose a biller to target this rule towards or choose ALL for all Billers.
- Start Time - Sets when the rule will take effect. Enter any freeform date or keyword. For more info on freeform dates please see NATS4 Freeform Date.
- End Time - Sets when the rule will expire. Enter any freeform date or keyword.
Emails
There are two types of mass mailers that you can setup, member mailers and affiliate mailers. There are two type of rule forms that correspond to there two types of mails, each with its own specific criteria.
Member Email Criteria
- Type - Can be one of SEND/HOLD/IGNORE.
- Status - Select at least for a status where the member must be at least of this status or more and exactly to target members only of this status. Choose between submitted for members that have submitted the join form, joined for a member that has fully joined, and expired for members that have expired.
- Trial - Select All for all members, Trial for trial members, and Full for full members.
- Biller - Select a biller to send an email to members who joined using a particular biller.
- Site - Select the site's members you want to send an email to.
- Rebills - Specify here how many rebills a member must have in order to be effected by this rule.
- Active Days - Specify here how long a member needs to be active in order to be effected by this rule.
- Optin - Check this box if you want to give the member a link to opt-in to future emails.
- Start Time - Specify here when you want this rule to start.
- End Time - Specify here when you want this rule to end.
Affiliate Email Criteria
- Type - Can be one of SEND/HOLD/IGNORE.
- Status - Select a status for the affiliates that you want to send an email to. Choose from ANY, ACTIVE, DISABLED, and BANNED.
- Affiliate - Type in the name if the affiliate you want to send an email to.
- Profit - Specify here how much profit an affiliate must have earned in order to be effected by this rule.
- Active Days - Specify here how long an affiliate needs to be active in order to be effected by this rule.
- Optin - Check this box if you want to give the affiliate a link to opt-in to future emails.
- Start Time - Specify here when you want this rule to start.
- End Time - Specify here when you want this rule to end.
Cross Sales
Simple Form Criteria
- Type - Can be one of ENABLE/DISABLE/IGNORE. Choose one of the three states that a rule can be.
- Affiliate - Type in the name of the affiliate that you want this rule to effect or type ALL for all affiliates.
- Program - Choose a program from the drop-down that you would like to use this rule for or choose All Program for all.
- Option - Choose the join option from the drop-down that you would like to use this rule for or choose All Options for all.
Advanced Form Criteria
- Tour - Choose a site from the drop-down that you would like to use this rule for or click All Tours.
- Start Time - Sets when the rule will take effect. Enter any freeform date or keyword. For more info on freeform dates please see NATS4 Freeform Date.
- End Time - Sets when the rule will expire. Enter any freeform date or keyword.
- Country - Choose the countries you would like to target with this rule.
- Cascade - Choose which cascade you would like this rule to be in effect for.


