Difference between revisions of "NATS4 Email Configuration"
TMMStephenY2 (talk | contribs) |
TMMStephenY2 (talk | contribs) |
||
| Line 14: | Line 14: | ||
To take advantage of these features, you must first create mailers to go out in the [[NATS4 Mailing Admin|Mailing Admin]]. To do so, go to the Mailing Admin and fill out the forms next to ''New Mailer:'' | To take advantage of these features, you must first create mailers to go out in the [[NATS4 Mailing Admin|Mailing Admin]]. To do so, go to the Mailing Admin and fill out the forms next to ''New Mailer:'' | ||
| − | First enter a [[freeform date]] for when the mail is to be sent out. Next, choose whether you want to send the email to Affiliates or Members under the ''Send To'' options from the drop-down box, and fill in the email Subject then click the Add button. | + | First enter a [[NATS4 Freeform Date|freeform date]] for when the mail is to be sent out. Next, choose whether you want to send the email to Affiliates or Members under the ''Send To'' options from the drop-down box, and fill in the email Subject then click the Add button. |
You will then be able to create Plain Text and HTML versions of the email you wish to send out, choosing which will be sent out under the [[NATS4_Configuration_Admin|Configuration Admin]]. This can be further edited by clicking the edit mail button under the "Active Mailings" section once the mailer has been completed. | You will then be able to create Plain Text and HTML versions of the email you wish to send out, choosing which will be sent out under the [[NATS4_Configuration_Admin|Configuration Admin]]. This can be further edited by clicking the edit mail button under the "Active Mailings" section once the mailer has been completed. | ||
Revision as of 17:02, 3 August 2010
The NATS4 email function allows clients to have complete control over any automated emails that are sent out to members, affiliates, owners, account reps, and site partners by NATS.
This works in conjunction with the mailing admin, as under NATS4 all outgoing emails are now required to go through a queue in the mailing admin before they are sent out.
Through the NATS email function, you will be able to control features such as what address the mail is sent from, what address to respond to, the method through which it is sent, when the email is sent, the subject of the email, and what actions triggered the sending of the email.
Creating Emails
To take advantage of these features, you must first create mailers to go out in the Mailing Admin. To do so, go to the Mailing Admin and fill out the forms next to New Mailer:
First enter a freeform date for when the mail is to be sent out. Next, choose whether you want to send the email to Affiliates or Members under the Send To options from the drop-down box, and fill in the email Subject then click the Add button.
You will then be able to create Plain Text and HTML versions of the email you wish to send out, choosing which will be sent out under the Configuration Admin. This can be further edited by clicking the edit mail button under the "Active Mailings" section once the mailer has been completed.
All outgoing mails are now required to go through a queue in the Mailing Admin before they are sent out. If the emails are not being sent properly, it may be due to an issue with your Cron settings.
In order for Automated Emails to be sent from NATS, you must first set up at least one rule under the Mailing Admin section.
Modifying Skins and Templates
You can edit the body text of automated emails through the Skins & Templates Admin in NATS. To access the email templates, go to Skins & Templates Admin, then click the Special Templates tab to get a list of available templates you can customize.
Templates for emails will be specified by their title beginning with "mail," such as mail_affiliate_on_member_cancelled. Conversely you can choose to only view mail templates by clicking the drop-down menu marked Manage Special Templates and selecting the "mail" option.
If you want to customize a certain template, click the "Edit Template" icon and you will be able to customize the email's header, footer, and body text. The NATS Mailing Function uses Smarty scripts in order to automatically personalize emails and specify why the email has been sent for members, affiliates, etc. Once you are done editing the email Template to your liking, click the Save Template button to make your changes take effect.
You can preview your email templates by clicking the magnifying glass option under the "Actions" column. If you want to revert your changes back to the default template, click the "Revert Changes" option indicated by the two blue arrows.
Modifying Configuration Admin Settings
NATS4 allows you to configure automated emails beyond the standard Mailing Admin. Through the conifguration admin, you can edit to whom, to where, when, and under what conditions an email will be sent. To modify NATS email function settings, first go to the Configuration Admin, select Emails from the Current Section drop-down menu, and click Change Section.
General Settings
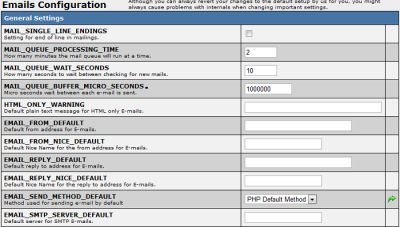
From the Emails Configuration section you can edit custom settings for automated emails to members, affiliates, site owners, account representatives, and site partners. General Settings allows you to set basic options on outgoing emails from NATS. The first set of options work in conjunction with options set in the Mailing admin:
- MAIL_SINGLE_LINE_ENDINGS - This option is not currently in use and will not affect anything.
- MAIL_QUEUE_PROCESSING_TIME - This designates how many minutes at a time the mail queue will run for.
- MAIL_QUEUE_WAIT_SECONDS - This sets how many seconds the Mailing Admin should wait between checking new mails.
- MAIL_QUEUE_BUFFER_MICRO_SECONDS - This sets how many micro seconds the Mailing Admin should wait between sending emails.
- HTML_ONLY_WARNING - This allows you to set an automated plain text message when an email is HTML only.
The next set of fields under General Settings allows you to configure what email addresses the mails are sent from, as well as sending methods and security options:
- EMAIL_FROM_DEFAULT - Designates a default email address to send mails from.
- EMAIL_FROM_NICE_DEFAULT - This field specifies what particular name is displayed next to the email address.
- EMAIL_REPLY_DEFAULT - Designates a default email address to reply to mails to.
- EMAIL_REPLY_NICE_DEFAULT - This field specifies what particular name is displayed next to the reply-to address.
- EMAIL_SEND_METHOD_DEFAULT - Use the drop-down menu to choose between mails being sent from the default PHP method and the Custom SMTP method
- PHP vs. SMTP - SMTP is generally recommended over PHP Mail for mass emails, as SMTP tends to be quicker and bogs down a server less than PHP mails. This is because PHP Mail opens and closes an SMTP socket for each email, while SMTP acts as its own mail server. However, the SMTP option requires that you have an SMTP server to use.
- We do not provide SMTP servers, you must have your own SMTP server set up in order to use our Custom SMTP email option.
- EMAIL_SMTP_SERVER_DEFAULT - Sets the default server to be used for SMTP mails
- EMAIL_SMTP_PORT_DEFAULT - Sets the default port to be used for SMTP mails
- EMAIL_SMTP_USERNAME_DEFAULT - Sets the default username to log in for SMTP mails
- EMAIL_SMTP_PASSWORD_DEFAULT - Sets the default password to log in for SMTP mails
- EMAIL_BCC_TO_DEFAULT - You can use this to automatically send a blind carbon copy of an email to a certain email address.
These settings can further be refined through the options and fields below.
"Sending To" Settings
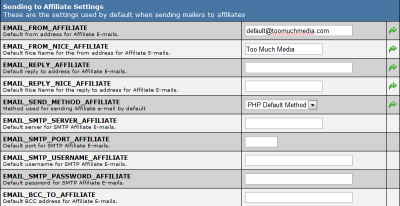
Under the individual Sending to Settings, fields will be the same for members, affiliates, etc. with the exception of who the mail is sent to. The description of these fields is the same as those under general settings, except that these settings can be individually designated for:
- Sending to Members
- Sending to Affiliates
- Sending to Owners
- Sending to Account Representatives
- Sending to Site Partners
This allows for a great deal of flexibility in creating different settings for emails sent to different types of people associated with your site.
Most of the time it will not be necessary to edit or individually set these options. However if sending emails from different addresses is necessary, these options will override the General Settings found above.
Email Affiliate Subjects
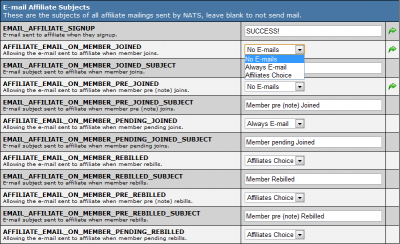
The NATS Mailing Function allows you to set the subject of any automatically-generated email through the Email section of the Configuration Admin. You can do this under the options entitled EMAIL_AFFILIATE_SIGNUP or the options beginning with EMAIL_AFFILIATE_ON_MEMBER.
Additionally NATS4 allows you to designate only certain Emails to be sent to affiliates automatically, such as when a member initiates a cancellation or a chargeback. To configure this, use the drop-down menus next to configuration options starting with AFFILIATE_EMAIL_ON_MEMBER, such as AFFILIATE_EMAIL_ON_MEMBER_JOINED. Once you click the drop-down menu, you will see three choices that are universal across the Mailing Function:
- No Emails - Emails will not be sent for this particular topic when this choice is selected.
- Always Email - Emails will always be sent for this particular topic when this choice is selected.
- Affiliate's Choice - Affiliates will be able to select whether or not they receive emails on this topic.
If you leave these fields blank, the mails will not be sent.
At the bottom of the Email Affiliate Subjects section, there are categories to set affiliate email subjects using Smarty scripts in order to automatically designate what project or website the email is sent from. These include EMAIL_AFFILIATE_FORGOT_PASSWORD, EMAIL_AFFILIATE_NOTIFY and the fields under those topics.
Remember: These fields only affect the subject line of an email. To change the body text of automated emails, you must edit the email templates under the Skins & Templates Admin.
Email Owner Subjects
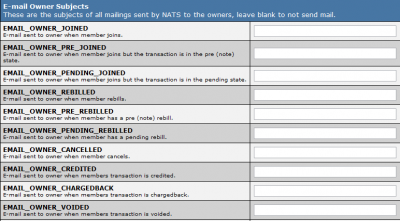
Email Owner Subjects allows you to set specific email subjects based on certain member and affiliate action, such as when a member joins or cancels, or when an affiliate signs up. When these conditions are triggered, an email will be automatically composed to the site owner based on these settings.
Each setting is specified by the last word or phrase in each field, such as EMAIL_OWNER_JOINED or EMAIL_OWNER_REBILLED; each setting is also detailed by a short description of what the change will affect under each field title. By using these fields you can create email topics for specific events and conditions.
If you leave these fields blank, no mails will be sent.
Remember: These fields only affect the subject line of an email. To change the body text of automated emails, you must edit the email templates under the Skins & Templates Admin.
Send To Address
This section allows you to set what email address incoming mails from NATS will be sent to.
- EMAIL_TO_OWNER - designates an email address for mails sent to the site owner.


