Difference between revisions of "NATS4 Cascade"
TMMStephenY2 (talk | contribs) |
TMMStephenY2 (talk | contribs) m |
||
| Line 5: | Line 5: | ||
== What Are Cascades? == | == What Are Cascades? == | ||
A [[Cascade|cascade]] sends [[ct#Surfer|surfers]] through multiple [[Biller|billers]] based on their payment option in order to encourage more customers to sign-up. If a customer is rejected from one billing processor, the cascade will put them through all available billing options until they are either accepted by a processor, or rejected by all available processors. | A [[Cascade|cascade]] sends [[ct#Surfer|surfers]] through multiple [[Biller|billers]] based on their payment option in order to encourage more customers to sign-up. If a customer is rejected from one billing processor, the cascade will put them through all available billing options until they are either accepted by a processor, or rejected by all available processors. | ||
| + | |||
| + | [[File:Biller_cascades.PNG|450px|Available Biller Cascades]] | ||
== Cascades At A Glance == | == Cascades At A Glance == | ||
Revision as of 16:35, 29 July 2010
What Are Cascades?
A cascade sends surfers through multiple billers based on their payment option in order to encourage more customers to sign-up. If a customer is rejected from one billing processor, the cascade will put them through all available billing options until they are either accepted by a processor, or rejected by all available processors.
Cascades At A Glance
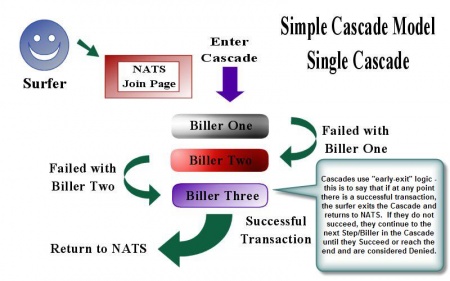
If a particular biller denies a surfer transaction, the surfer is sent to the next biller in the cascade. The diagram, Figure 1.1, provides a simple, graphical representation of this process:
Surfers are sent from one biller to the next until they complete a transaction or the surfer reaches the end of the Cascade. A cascade ends with either of the two special cascade steps: Stop Cascade or Switch Cascade step. For example: a credit card processing cascade might switch cascade to a check processing cascade.
Each Cascade has a description attribute, which is displayed to the surfer on the Join Form. Usually this description is "Join by payment type." By selecting a payment type, the surfer transparently selects the Cascade to handle their transaction.
Cascades can also geo-target whole Cascades or individual Cascade steps using the GeoIP program. Geo-targeting sends surfers from a designated location to a different cascade than surfers from another location.
NATS can also randomly choose the cascade a surfer sees. For example: you can divide your surfers between two billers to test the biller's effectiveness.
Adding a cascade
To create a new cascade, go to Billers Admin, click the "Add a Cascade tab," and enter a Short Name for your cascade when prompted. On the next page, you will be able to add the billers you wish to use for this cascade. The next steps are as follows:
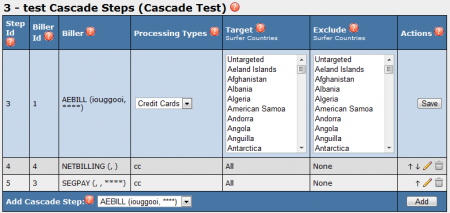
- Select a preferred biller from the "Add Cascade Step" drop-down menu and click Add.
- Select the Processing Type you would like to support.
- Select any countries to target or exclude with your new cascade. For more information, please see our Geo-Targeting Cascades wiki article.
- Click Save to add your new Cascade Step.
- Add more billers as needed by repeating the steps outlined above.
- Once all cascade options have been exhausted by a surfer, NATS will automatically send them to the Denial URL.
Note: Two cascades will be automatically created if you have selected a biller that supports both credit card and check processing. You may either use or ignore these default cascades.
Once you have finished adding all your desired billers to your new cascade, go back to the Billers Admin main page, and click the "Edit" icon next to your newly created cascade.
On this next page, you will be able to edit general settings for your new cascade. Settings on this page include:
- Shortname - Used as internal identification in the NATS database
- Description - The cascade description that will be displayed to your affiliates
- Weight - Used to increase probabilities of a cascade being displayed. For more detailed information on the options available here, please see our Cascade Weight, Autocascade, Hidden Cascades, and Gateway One Step Join wiki articles.
- Target/Exclude - If a country (or countries) is selected in Target, it will only display the cascade for that particular country. If a country (or countries) is selected in Exclude, the cascade will not be displayed for that particular country. For more information, please see our Geo-Targeting Cascades wiki article.
The cascade description is displayed on the pre-join form of each site that uses this cascade. The description is also used for random cascade switching. The cascade weight works with random cascade switching, but can be set to 256 to disable the pre-join form.
When you are done configuring your Cascade settings, click Save Changes.
After creating the cascade, you can go back and edit its settings, including the geo-targeting settings for individual steps or the cascade as a whole.
Editing the Steps in a Cascade
NATS4 Cascades consist of multiple steps, or billers, that the surfer goes through before they can complete the signup process. Each step in a cascade reflects a different biller that the surfer will be sent through if they are rejected from the prior step or biller.
- Click on the View icon (magnifying glass) on the cascade to view the biller order already set up in this cascade.
- Other billers can be selected from the drop-down box below the cascade. After clicking Add, the biller will appear in Edit mode.
- Select a method of processing from the first drop-down menu.
- By selecting a country in Target (or Exclude), the cascade only performs (or ignores) that step for people of that country. Selecting no billers selects all billers, while multiple countries can be selected by holding down the CTRL key while selecting. CTRL and re-clicking will unselect an item.
- After saving, four options appear in the biller actions line: arrows that will move the option up or down in the list, edit, and delete.
- There are 4 other options in the Biller drop-down box that can be used to set up a cascade:
- Stop Cascade -- stop executing the cascade
- Switch Cascade -- switches from one cascade to another
- Show Template -- shows a predetermined template on the site
- Redirect -- sends them to a designated web page
Editing the Cascade's Details
To edit your Cascade's details, go to the Billers Admin, scroll down to the "Biller Cascades" section, and click the Edit icon that corresponds to the cascade you wish to edit.
- Two features use the Weight setting
- NATS will switch between two cascades with the same description, using the weight to decide which to display. The option with a higher weight will appear more.
- Automatic Cascade skips the join form cascade selection and sends the surfer directly to the first biller in the cascade. This option is usually used with geo-targeting.
- Hide Cascade lets you associate the cascade with a site but not have it appear on the join form. You can use this to offer the cascade later, like on the Denial template when other options have been exhausted.
- Gateway One Step Cascade allows surfers to bypass the NATS pre-join page entirely. This option will show a combination of the NATS pre-join page and the Gateway join page.
Note: This option will only work if the first biller in your cascade is a Gateway
- Target/Exclude can be used on the entire cascade. This will actually add or remove it from the join form for those countries
Extra Cascade Rules
You can add extra cascade Rules by clicking the Edit Cascade Rules icon. These extra rules allow you to limit this cascade to certain affiliates, programs, sites, times, and tours with the ENABLE rule. You can also choose to exclude certain affiliates, programs, sites, times, and tours from your cascade with the DISABLE rule. For more information on setting up Rules, please see our NATS4 Rules wiki article.
NOTE: You MUST have at least one rule configured for your cascade, otherwise it will not work.


