Difference between revisions of "NATS4 Configuring Upsells"
TMMStephenY (talk | contribs) m |
|||
| Line 40: | Line 40: | ||
To configure a new Incoming Upsell, select your desired [[Ct#Biller|biller]], [[Ct#Site|site]], and [[Ct#Program|program]] from the drop-down menus below the "Incoming Upsells" table. After you have chosen your selected biller, site, and program, click the "Add New Option" button. | To configure a new Incoming Upsell, select your desired [[Ct#Biller|biller]], [[Ct#Site|site]], and [[Ct#Program|program]] from the drop-down menus below the "Incoming Upsells" table. After you have chosen your selected biller, site, and program, click the "Add New Option" button. | ||
| − | You will then see a variety of fields that must be configured before you proceed. The fields under the "Details" column will be seen by your [[Ct#Member|members]]. Fill in your desired option title, as well as the initial and recurring fees for this upsell option. | + | You will then see a variety of fields that must be configured before you proceed. The fields under the "Details" column will be seen by your [[Ct#Member|members]]. Fill in your desired option title, as well as the initial and recurring fees for this upsell option. "Package ID" is used to leverage the [[NATS4_Package_Plus|NATS4 Package Plus]] functionality. This field allows you to connect this incoming Upsells to price points already set up for the appropriate site in your system. |
The "Biller Info" column contains biller-specific information fields. The information for these fields must be obtained directly from your specified biller. When you have finished configuring the available fields, click "Save Changes". | The "Biller Info" column contains biller-specific information fields. The information for these fields must be obtained directly from your specified biller. When you have finished configuring the available fields, click "Save Changes". | ||
[[Category:NATS4 Upsells]] | [[Category:NATS4 Upsells]] | ||
Revision as of 13:18, 6 December 2012
NATS4 allows you to create upsells, which allows your members to upgrade their account to a more expensive option. This can be done through the Upsells Admin.
Setting Up an Outgoing Upsell
To set up an Outgoing Upsell in NATS, go to the Upsells Admin and click the "Outgoing Upsells" tab at the top of the page. Outgoing upsells allow a member to upgrade their account through a join option.
The "Outgoing Upsells" table lists any existing outgoing upsells, along with various information regarding them.
- Biller - Displays the biller used to process this upsell, along with your account information for that biller.
- Details - Displays the title of your upsell, as well as the given description and disclaimer. This also displays if the upsell is enabled or disabled for all join options.
- Biller Info - Displays any relevant information required by your biller. This information must be obtained directly from your biller.
To configure a new Outgoing Upsell, select your desired biller from the "Biller" drop-down menu below the Outgoing Upsells table and click "Add New Option".
On the next page, you will need to fill out any necessary details for your upsell. The title, description, and disclaimer here will be displayed to members on your join pages. Fill out these fields, and use the checkbox to determine if you want this upsell enabled for all join options. You will then need to fill out the necessary biller information, which must be obtained directly from your biller.
Before you can use your new upsell, you must first add one or more Display Rules. To do so, click the "Set Display Rules" action icon next to the Upsell option you wish to activate.
On the next page, you can use the "Add Rule" table to add a new display rule for your upsell. Select what type of rule you want, along with which affiliates, join option, and program you want it to affect. For more information on configuring rules, please see our NATS4 Rules wiki article. When you are done configuring your new rule, click the "Save Rule" button.
Setting Up an Incoming Upsell
To set up an incoming Upsell in NATS, go to the Upsells Admin and click the "Incoming Upsells" tab at the top of the page. Incoming upsells process the member's account upgrade and apply it.
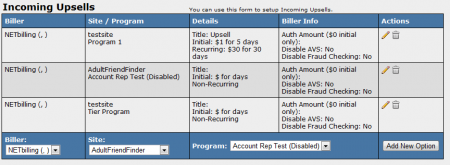
The "Incoming Upsells" table lists any existing incoming upsells, along with various information regarding them.
- Biller - Displays the biller used to process this upsell, along with your account information for that biller.
- Site/Program - Displays the site and program this upsell will apply to.
- Details - Displays the title of your upsell, as well as the initial and recurring membership costs.
- Biller Info - Displays any relevant information required by your biller. This information must be obtained directly from your biller.
To configure a new Incoming Upsell, select your desired biller, site, and program from the drop-down menus below the "Incoming Upsells" table. After you have chosen your selected biller, site, and program, click the "Add New Option" button.
You will then see a variety of fields that must be configured before you proceed. The fields under the "Details" column will be seen by your members. Fill in your desired option title, as well as the initial and recurring fees for this upsell option. "Package ID" is used to leverage the NATS4 Package Plus functionality. This field allows you to connect this incoming Upsells to price points already set up for the appropriate site in your system.
The "Biller Info" column contains biller-specific information fields. The information for these fields must be obtained directly from your specified biller. When you have finished configuring the available fields, click "Save Changes".

