Difference between revisions of "CSS Theme Builder"
TMMStephenY (talk | contribs) m (moved Edit CSS Colors to CSS Theme Builder) |
TMMStephenY (talk | contribs) |
||
| Line 5: | Line 5: | ||
{{NATS 4.1}} | {{NATS 4.1}} | ||
| − | The CSS Color Picker is a new feature in [[ | + | The CSS Color Picker is a new feature in [[NATS4.1]], which allows you to easily change the look and feel of your [[Ct#Affiliate|affiliate]]-side [[Ct#Skin|skins]] and [[Ct#Template|templates]]. |
Instead of having to individually edit each [[Ct#Template|template]] in your [[Ct#Skin|skin]] that you want to change the look and feel of, you can use the CSS Color Picker to change various how various elements look on all of your [[Ct#Affiliate|affiliate]] [[Ct#Template|templates]], like changing the color scheme of each page, changing the header logo, and including a background image for the body of the pages. | Instead of having to individually edit each [[Ct#Template|template]] in your [[Ct#Skin|skin]] that you want to change the look and feel of, you can use the CSS Color Picker to change various how various elements look on all of your [[Ct#Affiliate|affiliate]] [[Ct#Template|templates]], like changing the color scheme of each page, changing the header logo, and including a background image for the body of the pages. | ||
| Line 13: | Line 13: | ||
== Skins and Templates Admin == | == Skins and Templates Admin == | ||
| − | To begin a basic customization of your [[Ct#Affiliate|affiliate]]-side [[Ct#Template|templates]], log into your [[ | + | To begin a basic customization of your [[Ct#Affiliate|affiliate]]-side [[Ct#Template|templates]], log into your [[NATS4.1]] installation, and go to the [[NATS4 Skins and Templates Admin|Skins and Templates Admin]]. |
| − | On the main [[NATS4 Skins and Templates Admin|Skins and Templates Admin]] page, locate the [[Ct#Skin|skin]] that you wish to customize in the "Manage Affiliate Skins" template. [[ | + | On the main [[NATS4 Skins and Templates Admin|Skins and Templates Admin]] page, locate the [[Ct#Skin|skin]] that you wish to customize in the "Manage Affiliate Skins" template. [[NATS4.1]] contains both "Light" and "Dark" themes by default, which provides a good starting point for customizing [[Ct#Skin|skins]], as well as providing default [[Ct#Skin|skins]] with contrasting themes. |
You can also create as many new [[Ct#Skin|skin]] to customize as you want, based off of preexisting skins. Just click the "Add New Skin" action icon, marked by a green plus sign, next to the skin you wish to base your new [[Ct#Skin|skin]] off. Enter a name for your new [[Ct#Skin|skin]], and click OK. Your new [[Ct#Skin|skin]], which inherits the properties of the skin you based it off of, will now be created. | You can also create as many new [[Ct#Skin|skin]] to customize as you want, based off of preexisting skins. Just click the "Add New Skin" action icon, marked by a green plus sign, next to the skin you wish to base your new [[Ct#Skin|skin]] off. Enter a name for your new [[Ct#Skin|skin]], and click OK. Your new [[Ct#Skin|skin]], which inherits the properties of the skin you based it off of, will now be created. | ||
Revision as of 14:49, 13 May 2011
Note: This article only applies to NATS version 4.1 and higher. If you wish to upgrade your installation of NATS in order to take advantage of this feature, please put in a support ticket.
The CSS Color Picker is a new feature in NATS4.1, which allows you to easily change the look and feel of your affiliate-side skins and templates.
Instead of having to individually edit each template in your skin that you want to change the look and feel of, you can use the CSS Color Picker to change various how various elements look on all of your affiliate templates, like changing the color scheme of each page, changing the header logo, and including a background image for the body of the pages.
This lets you save time by allowing basic edits to be made to every template stored in the skin you decide to customize, removing the need to alter code for every template you wish to change.
Skins and Templates Admin
To begin a basic customization of your affiliate-side templates, log into your NATS4.1 installation, and go to the Skins and Templates Admin.
On the main Skins and Templates Admin page, locate the skin that you wish to customize in the "Manage Affiliate Skins" template. NATS4.1 contains both "Light" and "Dark" themes by default, which provides a good starting point for customizing skins, as well as providing default skins with contrasting themes.
You can also create as many new skin to customize as you want, based off of preexisting skins. Just click the "Add New Skin" action icon, marked by a green plus sign, next to the skin you wish to base your new skin off. Enter a name for your new skin, and click OK. Your new skin, which inherits the properties of the skin you based it off of, will now be created.
Find your new skin (or the skin you want to customize), and click the "Edit CSS Colors" action icon, marked by a paint palette. You can edit the CSS Colors for both basic skins and advanced skins through this admin.
Finding the Color Picker
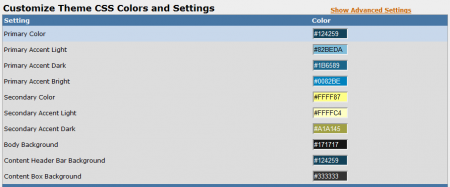
Once you've chosen the skin you want to customize, you'll be taken to the CSS Colors page for that skin. Here, you'll find a "Customize Theme CSS Colors and Settings" table, where you can choose the individual colors you want to use in your skin's custom color scheme.
Each color listed here corresponds to a different element of each affiliate page in NATS. This includes:
- Primary Color - Affects elements like the Header Background color.
- Primary Accent - Affects elements like link text and button text colors.
- Secondary Color - Affects elements like hover text.
- Secondary Accent - Affects elements like tooltip and calendar backgrounds.
- Body Background - Affects the background color of the affiliate pages.
- Context Header Bar Background - Affects the headers for each individual section found on any affiliate page.
- Context Box Background - Affects the background color of each individual section found on any affiliate page.
Customizing Your CSS Colors and Settings
Colors
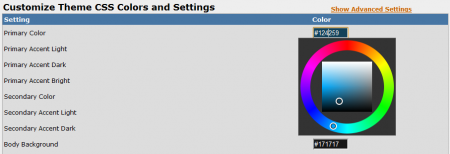
Click on any of the color values listed in this table to change the color for the element you wish to edit, such as Primary Color. Once you do, you'll see a color wheel pop up, which allows you to choose the exact color and shade that you want to use.
Use the color wheel here to choose the color you want that element displayed in. After you choose your desired color, the square inside of that ring will automatically change to show different shades of the chosen color. Use this to pick the exact shade you want to see for that color -- this lets you easily find the exact color and shade you want to use for your affiliate pages.
Click off of the color wheel once you've chosen the color and shade you want for the element you are editing, and the hex value listed the "Color" column will automatically adjust itself to match your customization.
Repeat this process for every color you want to alter in your affiliate-side skin.
You'll see a "Revert to Parent Skin" icon, marked by two arrows, next to any of your customized colors on this page. Clicking this icon will reset your changes back to the skin's default value, allowing you to quickly reset any unwanted change to your skin. This can be useful if you've accidentally changed the wrong setting on this page, or if you've accidentally chosen the wrong color to change the setting to.
You can also edit each individual color displayed on your affiliate skin with the Advanced Settings here. Just click the "Show Advanced Settings" link at the top of the table, and you'll see every color setting that can possibly be customized in the NATS skins and templates.
The Advanced Settings allow you to go more in-depth, and customize every possible element shown on the NATS affiliate pages. Simply use the instructions provided above to customize your Advanced CSS color settings.
Header Logo
Not only can you alter the color theme of your affiliate skins in NATS, you can also easily upload a new Header Logo to be used on your affiliate pages here. The Header Logo determines what your affiliates will see in the top-left corner of each affiliate-side page.
Find the "Header Logo Upload" section of the CSS Colors page to upload a new header logo to be used by your skin. In this section you'll see an image preview of your Header Logo, a blank "URL" field, and a "Browse" option.
NATS allows you to either upload an image file to be used here, or enter the URL where your desired image file is hosted online. Copy and paste the URL of your desired image into the URL field here, or click the "Choose File" button to select an image to be uploaded from your hard drive.
Your new Header Logo then will be displayed on every affiliate page once you save your CSS settings.
Body Background Image
The Body Background Image allows you to upload or insert a background image to be used on all of the affiliate pages in NATS. Although the other settings on this page (colors and header logo) are required, this setting is optional, as you do not need to use a body background image on any of your affiliate pages.
Uploading a Body Background Image is similar to uploading a Header Logo. If your desired body background image is hosted remotely, just copy and paste the URL where your image is stored. If you need to upload your desired image to the NATS server, click the "Choose File" button to select an image to be uploaded from your hard drive.
Once you save your CSS settings, your new Body Background Image will be displayed in the background of the body text for every affiliate page in that skin.
Saving Your CSS Themes
Not only can you edit any of the colors and images that are used in your affiliate skins, you can save your custom CSS color schemes with the "Create New Theme" section on the CSS Colors page. This allows you to quickly and easily apply the color and image themes that you've saved to any of your affiliate skins.
To begin creating your new theme, set all of the colors and images that you want to save, using the instructions provided above. Once you've chosen the colors and images that you want to save to your new theme, locate the "Create New Theme" section on the top-right of the page.
Fill in the name you want to use for your new CSS Theme in the "Theme Title" field here, and click Save. Your new theme will now be saved for use across all affiliate skins in your NATS install.
Applying Your CSS Themes
Once you've saved your new CSS Theme, you can quickly and easily apply it to any of your NATS affiliate skins with the "Existing CSS Themes" section of the CSS Colors page.
Choose the CSS Theme you want to apply to your skin with the "Reset to Theme" drop-down menu at the top-left of this page. Once you've chosen your desired CSS Theme, click Save to apply your theme's CSS color settings and logos to your chosen skin.


