Setting Up CARMA
CARMA
|
|---|
Setting up CARMA for functionality is a multiple step process that involves various different areas of the system. The following article provides basic information on the setup process for CARMA.
Uploading Content
Before you can begin configuring the features and settings available to you in CARMA, you must first upload the content you wish to publish to your members. Without doing so, you will not be able to test anything in CARMA or set up any functional Members Area Templates or Tour Templates.
In order to add any new content to your CARMA system, you must upload your new pictures and/or videos to the carma/cms_incoming directory. Create a new directory for each content set you wish to upload. Uploaded videos must follow CARMA's video content naming convention.
For more information on uploading videos in CARMA, including the additional steps you must take, please see our Adding Content wiki article.
Creating a New Site
Once you have uploaded all of your desired content to your servers, you can begin creating a new site to display them on in CARMA.
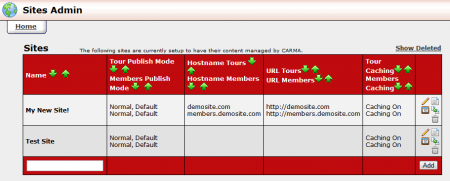
This can be done in the CARMA Sites Admin. Go to the Sites Admin and add a new site with the blank field at the bottom of the Sites table. Fill in the fields that appear with the required information, and click Save.
For more information on setting up a site in CARMA, please see our CARMA Sites Admin wiki article.
Setting Up Site Sections
Once you have created your new site in the Sites Admin, set up the Site Sections that you want to display your content on. Site Sections are the individual pages of your CARMA site, where you can display your uploaded content to your members.
To set up your Site Sections, go to the Sites Admin and click the "Manage Sections" action icon for the site you want to edit. You will see a Member's Area Homepage and a Main Tour page by default -- click the Add Section action icon (green plus sign icon) to create a new section under your default pages. Your new Site Sections will inherit the characteristics of its parent section -- so a new tour page will inherit the templates and settings from the Main Tour Page.
We recommend that you create unique Site Sections for each type of content you wish to offer to your members, as well as some other pages you may want to offer. For example, you may want to set up a section for photos, a section for videos, a section for third party videos (provided to your members by an outside source), and even a section that lists the actors featured in your content.
For more information on setting up new Site Sections in CARMA, please see our Site Sections wiki article.
Publishing Content
Now that you have created new Site Sections to display uploaded content for your members on, you must publish your uploaded content to these Site Sections.
You can do this in either the Gallery Content Admin or the Video Content Admin, depending on what type of media you are publishing. Navigate to the Gallery Content Admin or Video Content Admin, locate the content set you want to publish to your site, and click the "Publish gal/set on specific sites and specific times" action icon.
On the next page you can create Gallery Rules in the "Add New Gallery Rule" section, which allows you to choose the site section you want to publish your content on, as well as when you want the content to be published. This section contains the following fields:
- Site - Section - Choose which site section you want to display this content on.
- Activate From Date - Enter the date you want this content to be available from. Fill in this field with "now" to immediately publish your content, or fill in a future date to schedule your content.
- Until Date - Enter the date you want this content to stop being available. This field is set to "forever" by default. Change this to any date you wish if you want to only offer this content for a limited time.
Click Add once you have set the fields here, and your content will be published for the dates that you specified. For more information on publishing your gallery/video content on a set schedule, please see our Content Set Schedule and Publish Mode wiki articles.
Editing Templates
We intentionally made the default CARMA templates very basic, in order to support a wide variety of customization by webmasters. This means that you will have to manually customize your CARMA templates before you can offer content to your members. Go to the Templates Admin to do so.
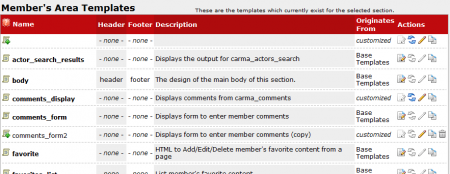
CARMA splits up its templates into two sections -- Members Area Templates and Tour Templates. This helps to easily separate those sections, and individually edit your Member's Area and Tour pages.
To begin customizing your templates, click either the Members Area Templates tab or Tour Templates tab, located at the top of the page. Each site section in CARMA has its own set of templates, which allows you to create a unique look for each page that you offer. Use the "Manage Member's Area/Tours Templates for" drop-down menu at the top of the page to choose which site section you want to edit templates for.
Once you have done that, you can begin editing your templates. The body template determines the appearance of your site section -- so your index.php page will always draw from your body template for its look and feel.
Click the "Customize" action icon for the body template to begin editing it. You can use any of the CARMA Template Functions available to you in this template to include additional data. These functions include the other templates found in this section into your body template. For example, the carma_list_gals template function will include the list_gals template into your body template, while the carma_search function will include the search_results template into your body template.
For more information on the various template functions available in CARMA and information on how to use them, please see our CARMA Template Functions wiki article, where you will find a list of various template functions with links to their respective articles.
Once you configure your Members Area Templates and Tour Templates for functionality, your CARMA site will be ready for use by your members.


