NATS For Networks Flash Banners

From TMM Wiki
Jump to navigationJump to search
NATS For Networks
For Affiliates
Automatic SubIDs
Affiliate Stats Dumps
Linkcode
Affiliate Custom Pixels
Affiliate Host and Post
Affiliate Area
Affiliate Account Details
Affiliate Account Change Log
Affiliate Creatives
Affiliate Creatives Search
Affiliate Settings
Affiliate Custom Pixels
Affiliate Linkcodes
Affiliate Linkcode Settings
Affiliate Login History
Affiliate Messages
Affiliate Dashboard
Dashboard Key Statistics
Dashboard Statistics Summary
Affiliate Payment History
Quick Links
Affiliate Referrals Report
Affiliate Referring URL Report
Affiliate Remote Login
Affiliate Signup
Affiliate Statistic Filters
Affiliate Statistic Views
Affiliate SubIDs
NATS For Networks Setup
Creating Admin Accounts
Tracking Domain
Edit Affiliate Text
Edit CSS Colors
Getting Started Admin
Quick Start Guide
Tracking in NATS For Networks
Pixel Builder
Postback Examples
Replacement Variables
Currency Exchange Rates
Admin Dashboard
The Admin Dashboard
Reporting Admin
The Reporting Admin
Track and Strack
  Report Breakdowns
Profit and Loss Report
Subscription Report
Transactions Reports
Affiliate Ratios Report
Affiliate Managers Report
Referral Tier Payouts Report
Referral Signup Payouts Report
Additional Commissions Report
Graphical Affiliate Comparison Report
The Single Day Comparison Report
Actual Affiliate Payments Report
Offers Admin
The Offers Admin
Offers
Offer Setup
Affiliate Referrals
Tracking Domain
Commissions
Commission Changes
Suppression Lists
Pixel Builder
ID Numbers
Offer Partner
Offer/Landing Page Redirection
Setting Rules
Admin Host and Post
Offer Goals
Affiliates Admin
The Affiliates Admin
ID Numbers
Affiliate Managers
Affiliate Referrals
Affiliate Activation
Admin-Only Settings
Affiliate Overrides
Creating Admin Accounts
In-House Accounts
Add Manual Sale
Manual Invoice
Affiliate Documents
Affiliate Enabled Offers
Change Affiliate Status
Account Changes
Advertisers Admin
The Advertisers Admin
Account Changes
Advertiser Invoices
Generate Invoice
Advertiser Approval
Change Advertiser Status
Customers Admin
Customers Admin
Manually Adding a Customer
ID Numbers
Payments Admin
The Payments Admin
Payvia Types
Payout Periods
Payvia Dump Formats
Payment Dump Entry Numbers
Payment Dump Variables
Check Functions
Setting Rules
Payment Methods
Payza
REST API
General
API Overview
GET /service/ping
GET /service/set_currency_exchange_rates
Advertiser
POST /advertiser/add_advertiser
PATCH /advertiser/edit_advertiser
Affiliate
GET /affiliate/get_links
GET /affiliate/get_single_link
GET /affiliate/search
GET /affiliate/decode_trackingcode
PATCH /affiliate/edit_affiliate
POST /affiliate/add_affiliate
POST /affiliate/affiliate_login_ips
Config
GET /config/get_global_void_ips
GET /config/get_global_post_ips
GET /config/get_global_hostnpost_ips
POST /config/add_global_void_ip
POST /config/remove_global_void_ip
POST /config/add_global_post_ip
POST /config/remove_global_post_ip
POST /config/add_global_hostnpost_ip
POST /config/remove_global_hostnpost_ip
Creative
GET /creative/get_creatives
GET /creative/get_creative_fields
GET /creative/get_creative_rules
PATCH /creative/delete_creative
PATCH /creative/edit_creative
PATCH /creative/edit_creative_rules
PATCH /creative/undelete_creative
POST /creative/add_creative
POST /creative/add_creative_rule
POST /creative/delete_creative_rules
Offer
GET /offer/get_conversion_caps
GET /offer/check_orderid_exists
GET /offer/get_commission_changes
GET /offer/get_details
PATCH /offer/activate_offer
PATCH /offer/edit_landing_page
PATCH /offer/edit_offer
PATCH /offer/pause_offer
PATCH /offer/set_commission_change_payouts
PATCH /offer/set_enabled_affiliates
PATCH /offer/set_offer_categories
PATCH /offer/set_offer_countries
PATCH /offer/set_offer_goals
PATCH /offer/set_offer_groups
PATCH /offer/set_offer_marketing_types
PATCH /offer/store_offer_ips
POST /offer/add_commission_change
POST /offer/add_landing_page
POST /offer/add_offer
POST /offer/add_tracking_domain
Reporting
GET /report/profitloss
GET /report/transaction
Customer
PATCH /customer/lock
PATCH /customer/unlock
GET /customer/export
PATCH /customer/forget
Transaction
GET /transaction/transaction_payout_preview
PATCH /transaction/transaction_update_revenue_by_orderid
PATCH /transaction/transaction_update_revenue_by_transaction_hash
POST /transaction/process_void
POST /transaction/process_chargeback
POST /transaction/process_reversal
GET /transaction/click_details
Creatives Admin
The Creatives Admin
Add New Creatives
Add New Creative Type
Tracking Code
Code Builder
Track and Strack
Setting Rules
  Default Creative Types
Creative Types
Image Banners
Flash Banners
Dynamic Text Banners
Feeds
Mailers
Video Download
Video Embed
Page Peels
IM Popups
Footer Ads
Page Ads
Overlays
Communications Admin
The Communications Admin
Add News Item
Sending Messages
Signup Questions
Configuration Admin
The Configuration Admin
Affiliate Signup Postback URL
Edit Affiliate Text
Edit CSS Colors
Misc.
Rules
Freeform Date
Affiliate Custom Signup
Tracking Code
Tracking in NATS For Networks
Void Conversions Remotely

The Flash Banners Creative type lets you upload a flash banner of your choosing in order to help affiliates promote your offer. After uploading, NATS For Networks will automatically pass an affiliate linkcode into your flash banner.

In order to take advantage of this feature, however, your flash banners should be able to utilize the input parameter clickTag. To do this, your flash banner or button should have an action code similar to the following:

  on (release) {
    if (clickTAG.substr(0,5) == "http:") {
      getURL(clickTAG);
    }
  }

For more information on adding links for tracking purposes to your flash banners you should refer to this article:
http://www.adobe.com/resources/richmedia/tracking/designers_guide/

Uploading a Flash Banner

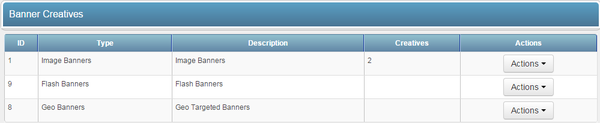
After you have edited your flash banner to accept the affiliate input link and redirect a visitor, you will need to upload your banner to NATS For Networks. You can do so by going to the Creatives Admin, scrolling down to the "Banner Creatives Types" category, and clicking the "View Creatives" action icon next to the "Flash Banners" creative type.

The Banner Creative Types Category

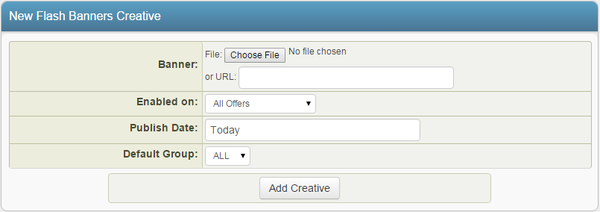
On the next page, you will see a section labeled "New Flash Banners Creative." Use the available "Banner" field to add the banner file you want to use; you can upload a file from your hard drive, or input a URL to load from in this field.

Once you have selected a file to use as your new Flash Banner, you can define the other available settings for your banner. These settings include:

  • Enabled on - Choose which offers you want the banner to be enabled for.
  • Publish Date - Input which date you want the banner to be available from.
  • Default Group - Select a creative group to categorize the banner under.

Once you have defined the available fields, click "Add Creative" to add your new image banner to NATS For Networks.

Adding a New Flash Banner

Your flash banner will now be displayed in the "Image Banners Creative" table, along with the other available flash banners and basic information regarding that flash banner.

When you have done this, your affiliates will be able to navigate to their Affiliate Tools page and get an embed code similar to the following:

<embed height="60" width="468" name="plugin" src="demo_banner.swf?clickTag=http://demo.nats4.com/track/MS4yLjAuMC4wLjIzLjAuMA" 
type="application/x-shockwave-flash" />

NOTE: For Default Affiliate skins, the embed code for the flash banner in the affiliate view will ONLY show with the following link styles: Encoded with HTML, Un-Encoded with HTML, and Shortname with HTML. Specific Affiliate Linkcode Settings may need to be adjusted.

Displaying an Image Banner

Before you can include your new Flash Banner on one of your offers, you must first add a "SHOW" rule. To do so, click on the "Add a new rule" action icon next to your new image banner. On the next page, simply add a "SHOW" rule type for the affiliate(s), commissions(s), and offers(s) you want this banner to be enabled for. You can also choose to enable this banner for all affiliates, commissions, and offers. For more information on rules in NATS For Networks, please see our Rules wiki article.

Adding a Flash Banner Rule

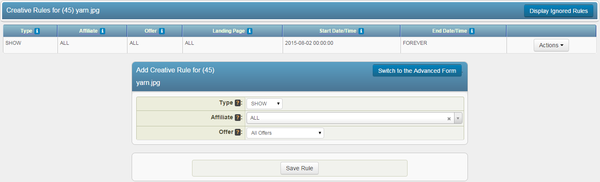
Once you create a "SHOW" rule for your new flash banner, affiliates will be able to grab the linkcode for that banner through their Creatives page.