NATS For Networks Add New Creative Type
NATS For Networks allows clients to add their own Creative types for use by affiliates. This feature provides the ability to use custom creatives that may not fit in the default categories.
Adding a New Creative Type
You can add new creative types through the Creatives Admin. Go to the Creatives Admin main page, click the "Add New Creative Type" tab at the top of the page.
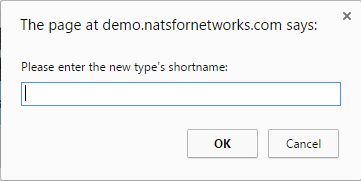
Enter the shortname for your creative type when prompted, and click OK.
This will take you to the "Editing Creative Type" page, where you can configure your new creative type. On this page, you will see various fields to be defined. This includes:
- Description - The description that will be displayed on the Creatives Admin main page.
- Display Template - Determines which template from the Skins and Templates will be used to display your Creatives.
- Form Template - Determines which template from the Skins and Templates will be used when affiliates select the creative type.
- Category - Determines which Creative category (banner, hosted, etc.) your new creative type will appear under in the Creatives Admin.
Once you are done configuring your new Creative Type's options, click "Save Changes".
Creative Fields
You will then need to configure your Creative Type's fields. These fields must be configured in order for you or your affiliates to be able to upload creatives to your new creative type.
An example of a necessary field for your creative type is an Image Upload or Video Upload field. This will allow admins and affiliates to upload media to be used as creatives for your sites.
There are multiple fields to be configured when creating a new Creative Field. These are:
- Shortname - The internal identifier for your creative field in NATS For Networks. This will automatically have a "ign_" prefix appended to it, to indicate that it is a custom creative.
- Name - The name of your field that will be displayed when viewing the creative type in NATS For Networks.
- Type - Determines what type of field this will be. This can be a text field, image upload box, multiple choice box, etc.
- Unique - Determines if the field requires an input that is unique from other fields for that creative type.
- Required - Determines if the field must be filled in before proceeding.
- Min/Max - Sets the minimum and maximum character length for that field.
- Display - Sets whether or not the field is displayed.
- Search - Sets the specified field to be searchable.
- Check - Sets a check function to be used for this field. For more information, please see the "Check Function Types" section of our Check Functions wiki article.
When you have finished configuring your creative field, click the "Add" button. The action icons in the right-hand column allow you to change the order the fields are displayed in, edit the existing fields, and delete an existing field.
You can then return to the Creatives Admin, where you will find your new creative type under the category you chose for it. To add new creatives to your new creative type, click the corresponding "View Creatives" action icon, upload your desired creative, configure the available settings, and click the "Add Creative" button.


