NATS For Networks Feeds

From TMM Wiki
Jump to navigationJump to search
NATS For Networks
For Affiliates
Automatic SubIDs
Affiliate Stats Dumps
Linkcode
Affiliate Custom Pixels
Affiliate Host and Post
Affiliate Area
Affiliate Account Details
Affiliate Account Change Log
Affiliate Creatives
Affiliate Creatives Search
Affiliate Settings
Affiliate Custom Pixels
Affiliate Linkcodes
Affiliate Linkcode Settings
Affiliate Login History
Affiliate Messages
Affiliate Dashboard
Dashboard Key Statistics
Dashboard Statistics Summary
Affiliate Payment History
Quick Links
Affiliate Referrals Report
Affiliate Referring URL Report
Affiliate Remote Login
Affiliate Signup
Affiliate Statistic Filters
Affiliate Statistic Views
Affiliate SubIDs
NATS For Networks Setup
Creating Admin Accounts
Tracking Domain
Edit Affiliate Text
Edit CSS Colors
Getting Started Admin
Quick Start Guide
Tracking in NATS For Networks
Pixel Builder
Postback Examples
Replacement Variables
Currency Exchange Rates
Admin Dashboard
The Admin Dashboard
Reporting Admin
The Reporting Admin
Track and Strack
  Report Breakdowns
Profit and Loss Report
Subscription Report
Transactions Reports
Affiliate Ratios Report
Affiliate Managers Report
Referral Tier Payouts Report
Referral Signup Payouts Report
Additional Commissions Report
Graphical Affiliate Comparison Report
The Single Day Comparison Report
Actual Affiliate Payments Report
Offers Admin
The Offers Admin
Offers
Offer Setup
Affiliate Referrals
Tracking Domain
Commissions
Commission Changes
Suppression Lists
Pixel Builder
ID Numbers
Offer Partner
Offer/Landing Page Redirection
Setting Rules
Admin Host and Post
Offer Goals
Affiliates Admin
The Affiliates Admin
ID Numbers
Affiliate Managers
Affiliate Referrals
Affiliate Activation
Admin-Only Settings
Affiliate Overrides
Creating Admin Accounts
In-House Accounts
Add Manual Sale
Manual Invoice
Affiliate Documents
Affiliate Enabled Offers
Change Affiliate Status
Account Changes
Advertisers Admin
The Advertisers Admin
Account Changes
Advertiser Invoices
Generate Invoice
Advertiser Approval
Change Advertiser Status
Customers Admin
Customers Admin
Manually Adding a Customer
ID Numbers
Payments Admin
The Payments Admin
Payvia Types
Payout Periods
Payvia Dump Formats
Payment Dump Entry Numbers
Payment Dump Variables
Check Functions
Setting Rules
Payment Methods
Payza
REST API
General
API Overview
GET /service/ping
GET /service/set_currency_exchange_rates
Advertiser
POST /advertiser/add_advertiser
PATCH /advertiser/edit_advertiser
Affiliate
GET /affiliate/get_links
GET /affiliate/get_single_link
GET /affiliate/search
GET /affiliate/decode_trackingcode
PATCH /affiliate/edit_affiliate
POST /affiliate/add_affiliate
POST /affiliate/affiliate_login_ips
Config
GET /config/get_global_void_ips
GET /config/get_global_post_ips
GET /config/get_global_hostnpost_ips
POST /config/add_global_void_ip
POST /config/remove_global_void_ip
POST /config/add_global_post_ip
POST /config/remove_global_post_ip
POST /config/add_global_hostnpost_ip
POST /config/remove_global_hostnpost_ip
Creative
GET /creative/get_creatives
GET /creative/get_creative_fields
GET /creative/get_creative_rules
PATCH /creative/delete_creative
PATCH /creative/edit_creative
PATCH /creative/edit_creative_rules
PATCH /creative/undelete_creative
POST /creative/add_creative
POST /creative/add_creative_rule
POST /creative/delete_creative_rules
Offer
GET /offer/get_conversion_caps
GET /offer/check_orderid_exists
GET /offer/get_commission_changes
GET /offer/get_details
PATCH /offer/activate_offer
PATCH /offer/edit_landing_page
PATCH /offer/edit_offer
PATCH /offer/pause_offer
PATCH /offer/set_commission_change_payouts
PATCH /offer/set_enabled_affiliates
PATCH /offer/set_offer_categories
PATCH /offer/set_offer_countries
PATCH /offer/set_offer_goals
PATCH /offer/set_offer_groups
PATCH /offer/set_offer_marketing_types
PATCH /offer/store_offer_ips
POST /offer/add_commission_change
POST /offer/add_landing_page
POST /offer/add_offer
POST /offer/add_tracking_domain
Reporting
GET /report/profitloss
GET /report/transaction
Customer
PATCH /customer/lock
PATCH /customer/unlock
GET /customer/export
PATCH /customer/forget
Transaction
GET /transaction/transaction_payout_preview
PATCH /transaction/transaction_update_revenue_by_orderid
PATCH /transaction/transaction_update_revenue_by_transaction_hash
POST /transaction/process_void
POST /transaction/process_chargeback
POST /transaction/process_reversal
GET /transaction/click_details
Creatives Admin
The Creatives Admin
Add New Creatives
Add New Creative Type
Tracking Code
Code Builder
Track and Strack
Setting Rules
  Default Creative Types
Creative Types
Image Banners
Flash Banners
Dynamic Text Banners
Feeds
Mailers
Video Download
Video Embed
Page Peels
IM Popups
Footer Ads
Page Ads
Overlays
Communications Admin
The Communications Admin
Add News Item
Sending Messages
Signup Questions
Configuration Admin
The Configuration Admin
Affiliate Signup Postback URL
Edit Affiliate Text
Edit CSS Colors
Misc.
Rules
Freeform Date
Affiliate Custom Signup
Tracking Code
Tracking in NATS For Networks
Void Conversions Remotely

The NATS For Networks Feeds Creative type lets you add RSS or ATOM feeds so you can continuously update your affiliates and/or customers on changes you have made to your offer or content.

This provides a simply and easy way to keep your subscribed affiliates and customers updated without having to create individual news items.

Adding a Feed

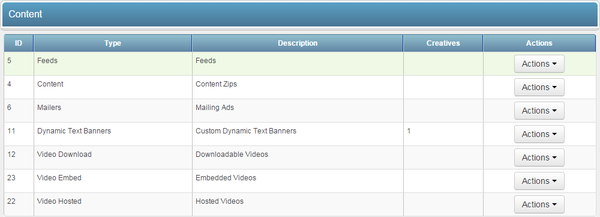
You can add a new feed to be used as an creative in NATS For Networks through the Creatives Admin. To do so, simply go to the Creatives Admin, go to the "Content Types" creative category, and click the "View Creatives" action icon next to the "Feeds" creative type.

The Content Types Creatives Category

On the next page, you will see a section labeled "New Feeds Creative." Use the available "Feed URL" field to enter the URL of the feed you wish to use with NATS For Networks.

Adding a New Feed Creative

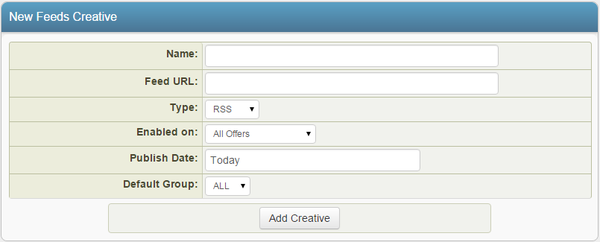
Once you have entered your desired feed URL, you can define the other available settings for your field. These settings include:

  • Name - The name of your new feed.
  • Type - Choose whether your feed is powered by RSS or by ATOM.
  • Enabled on - Choose customers of an offer (or all offers) that you want this mailer to be sent to.
  • Publish Date - Input the date you want this feed to be sent out.
  • Default Group - Select an creative group to categorize the feed under.

Once you have defined all of the available fields, click "Add Creative" to add your new Feed to NATS For Networks.

Your new Feed will now appear in the "Feeds Creative" table, along with the other available feeds. This table provides you with the creative ID number, name, URL, type, and default group of each available feed.

Activating a Feed

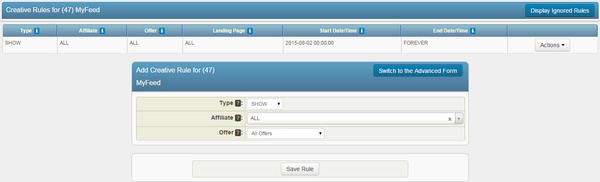
Before you can activate your newly created feed through NATS For Networks, you must first add a "SHOW" rule. To do so, click on the "Add a new rule" action icon next to your new feed. On the next page, simply add a "SHOW" type rule for the offer whose customers you want the feed to be available to. For more information about rules in NATS For Networks, please see our Rules wiki article.

Adding a Rule For Your Feed

Once you create a "SHOW" rule for your new feed, it will be automatically sent out by NATS For Networks on the publish date that you chose when creating it.