NATS5 Restricted Values
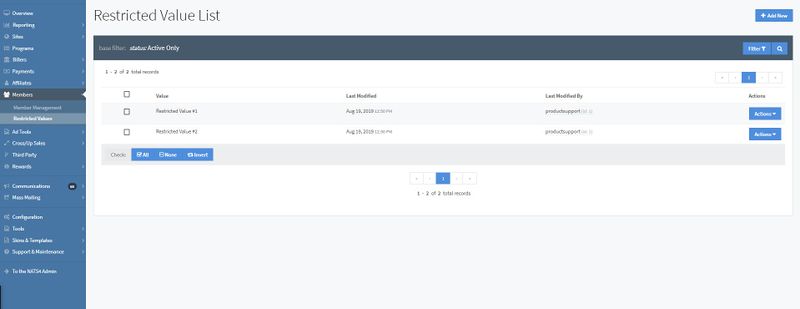
Restricted values allow you to better detect and find fraudulent members for your sites. This page allows you to manage your restricted value list. You can add, deactivate, and active values to/from/on this list. The restricted value will be used to detect members with that value in either their first name, last name, or username. Your restricted values can be seen by going to the Members section and clicking "Restricted Values". If a member signs up with a restricted value as a field, you will receive a notification saying that the member signed up with the restricted value.
Restricted Values List
The Restricted Values List displays the restricted values you have created, when they were last modified, and the affiliate username and ID that modified the value.
You can perform an action on a value by clicking the "Actions" button next to the corresponding value. You can also use the check boxes to the left of the value or multiple values and perform an action for one or multiple values.
You can filter the values in the list by active, deactivated, or both active and deactivated values by clicking on the "Filter" button under the "Add New" button and choosing your filtering option, then clicking "Submit".
Bulk Updates
The Restricted Value List allows you to perform an action on multiple values at the same time using a bulk update feature.
This option will be available once you click the check box of any value. The text in the box will display how many values are selected and you can either choose to restore previously deactivated values or deactivate currently activated values.
You can select all of the values by clicking the "All" button at the bottom of the list or by clicking the check box at the very top of the list, next to the "Value" column title. Additionally, you can uncheck all checked values by clicking the "None" button, or invert all of the check boxes by clicking the "Invert" button.
NOTE: If you wish to perform a bulk update on multiple values, they must be all active types or all deactivated types. Mixing types for a bulk update will return an error.
Deactivating and Reactivating Restricted Values
To indicate that a value has been deactivated, a red "deactivated" text will appear next to the value. This value can be reactivated and restored by either clicking the Actions button to the right of the value and clicking "Activate Restricted Value", or clicking the check box for that value and on the drop-down menu for the bulk update, you can then click "Restore (Undelete)" and then "Perform Action". This can be done for multiple deactivated values or one specific deactivated value.
To deactivate a value, you can also click the "Actions" button to the right of the value and click "Deactivate Restricted Value". Similar to restoring multiple values, you can click the check boxes next to any active values, and the bulk update actions will appear. There, click on the drop-down menu and choose the "Deactivate Selected" option, then click "Perform Action".
Adding a New Restricted Value
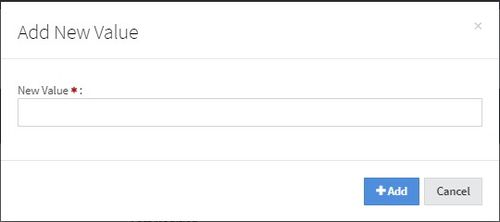
To add a new restricted value, click on the "Add New" button at the top-right of the page. There, the widget above will appear, where you can fill in the value that you would like to be restricted for a username, first name, and/or last name. When finished, click the "Add" button, and the new restricted value will automatically added as an active restricted value.


