The Mailing Management allows you to create, edit, and manage automated emails to affiliates and members. Here, you can view who mail goes out to, when it is sent, and the subject line of the email, as well as information about completed and scheduled mailings. This page can be accessed by clicking on the "Mass Mailing" section on the left menu and clicking "Mailing Management".
Mailing List
The Mailing List, by default, displays all mails that are either unscheduled, completed, ongoing, or scheduled. This information can be filtered to view specific mailings by clicking the "Filter" button at the top-right corner of the page. You can choose to view mailings based off of subject, frequency, status, and/or mail target.
The actions for each mailing include going to the Mailer Overview or Deleting the Mail. These can be done by clicking the "Actions" button and choosing your action.
The Mailing List includes some information about each mailing, including:
- Subject: The subject and main content of the mail.
- Target: Specifies whether the mailing will be sent to affiliates or members.
- Details: Details regarding the mailing, including:
- Frequency: How often to send the mail.
- Send On: The date that the mail will be sent.
- First Sent: The date and time that the mail was first sent.
- Last Sent: The date and time that the mail was last sent.
- End Count: The number of times the mailing was sent out.
- Email Total: The number of emails the mailing was sent out to.
You can choose to sort the list by Status/Added Date, just Added Date, Mailing Subject, First Sent date, or Last Sent date. To do so, click on the button next to the "Filter" button, and the option will appear in a widget.
Adding a New Mailing
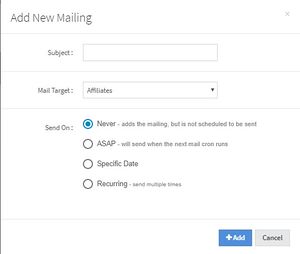
To add a new mailing, click on the "Add New Mailing" at the top-right of the page. When doing so, this widget will appear:

Adding a New Mailing Widget
You will have to fill in the subject of the mailing, the mail target (either sending the mailing to affiliates or to members), and when you want the mailing to be sent. These options include:
- Never: This will add the mailing to the mailing list, but will not be sent.
- ASAP: This will send the mailing when the next mail cron runs.
- Specific Date: You can choose a specific date using the date picker for when you want the mailing to be sent.
- Recurring: This will automatically send the mailing multiple times. If you pick this option, you can then choose to send the mailing daily, once a week, on the 1st day of every pay period, or once a month. By choosing once a month of once a week, you can then choose the specific day that the mailing should be sent.
When you are finished, click the "Add" button, and the mailing will be added to the Mailing List.

