NATS5 Ad Tool Types
NATS offers a variety of different ad tool types in order to help attract more members to your site(s). This allows for a great deal of flexibility in your affiliate promotions, as you can promote your site(s) through various methods.
Adding a New Ad Tool Type
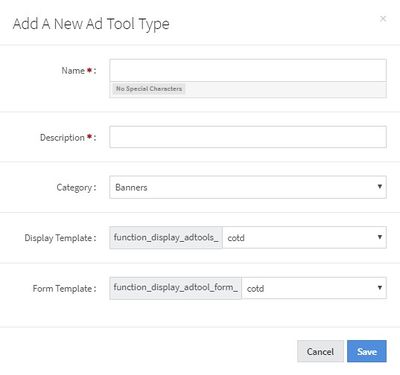
To add a new ad tool type, you first need to go to the Ad Tool Management page. There, click the "Add New" button at the top-right corner of the page and click "New Ad Tool Type".
Once this is clicked, a widget will appear, where you will have to fill in the following information:
- Name: The name of your new ad tool type.
- Description: A description for your ad tool type.
- Category: Click on the drop-down menu to choose the category you want to place your new type.
- Display Template:
- Form Template:
Once you are finished filling in the information, click the "Save" button, and the ad tool type will appear under the corresponding category.
Ad Tool Type Overview
In NATS5, Ad Tool Types have their own overview, where you can view and edit ad tool type details.
Details Tab
The details tab lets you view all type information and edit any information with dotted lines under its field or if there is an "Update" link next to a value. The information on the page includes:
- ID: A unique identifying number for the type.
- Name: The name of the ad tool type.
- Description: A small description for the type.
- Short Name: A single word identifier for the type.
- # of Assets: The number of ad tools that are under this type. Clicking the "View" button will display an ad tool assets list, and the "Add" button will add a new ad tool under this type.
- Category: The category that the type is under.
- Deleted: Indicates whether the type has been disabled/deleted.
- Protected:
- Bulk Import:
- Bulk Update:
- DB Table:
- Display Template:
- Form Template:
- Type Field:
Fields Tab
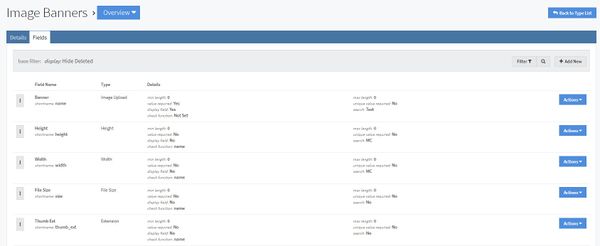
The Fields Tab allows you to edit and create fields for your ad tool type, including adjusting height, width, and texts.
To disable or edit a field, click the "Actions" button to the right of the field and choose your action. Similarly, you can re-enable a previously deleted/disabled field by clicking the "Filter" button to include deleted fields, and then choosing "Enable Field" when clicking on the "Actions" button.
You can also reorder the fields by clicking and dragging the field using the button to the left of the field.
Adding a New Field
To add a new field, click the "Add New" button at the top-right corner under the fields tab. A widget will then appear, where you will have to fill in all of the necessary information for your field, including:
- Field Name: The name of your new field.
- Short Name: A unique one-word name for your field.
- Field Type: The type of field, which can be chosen by clicking on the drop-down menu and choosing an available field type.
- Value Length: Fill in the minimum and maximum values of your field.
- Check Function:
- Options: Click on/check any of the options to add that option to your field.
When finished, click the "Add" button, and the field will be added to your ad tool type.


