Difference between revisions of "NATS5 Pay Via Overview"
| Line 5: | Line 5: | ||
| − | + | This Overview will allow you to view all [[NATS5 Pay Via Methods]]'s information, create and edit fields, and set up rules. | |
| − | |||
| − | |||
[[File:Pay-Via-Overview.jpg|border|1000px]]<br> | [[File:Pay-Via-Overview.jpg|border|1000px]]<br> | ||
| Line 16: | Line 14: | ||
*'''ID''': The Pay Via ID. | *'''ID''': The Pay Via ID. | ||
*'''Name''': The name of the Pay Via. | *'''Name''': The name of the Pay Via. | ||
| − | *'''# of Affiliates''': The number of affiliates enabled with this Pay Via Method. By clicking the magnifying glass icon next to the number, you will be redirected to the [[NATS5 Affiliate Management|Affiliate Management]] page, where you can see all of the affiliates enabled with the Pay Via Method. | + | *'''# of Affiliates''': The number of affiliates enabled with this Pay Via Method. |
| − | *'''Enabled by Default''': Indicates whether the Pay Via is | + | ** By clicking the magnifying glass icon next to the number, you will be redirected to the [[NATS5 Affiliate Management|Affiliate Management]] page, where you can see all of the affiliates enabled with the Pay Via Method. |
| + | *'''Enabled by Default''': Indicates whether the Pay Via is available for an affiliate to use by default. This can be changed by clicking the "Update" link next to the field. | ||
*'''Dump Format''': The format you can export payment dumps to for use in a payment processor or accounting program. | *'''Dump Format''': The format you can export payment dumps to for use in a payment processor or accounting program. | ||
*'''Minimum Payout''': A comma separated list of the amounts that affiliates can choose to be their minimum payout. | *'''Minimum Payout''': A comma separated list of the amounts that affiliates can choose to be their minimum payout. | ||
| Line 24: | Line 23: | ||
== Fields Tab == | == Fields Tab == | ||
| + | === Field List === | ||
Pay Via Fields refer to information fields where affiliates can fill in any necessary information to receive payments, such as bank account numbers, usernames, etc. | Pay Via Fields refer to information fields where affiliates can fill in any necessary information to receive payments, such as bank account numbers, usernames, etc. | ||
[[File:Pay-Via-Overview_Fields.jpg|border|600px]] | [[File:Pay-Via-Overview_Fields.jpg|border|600px]] | ||
| − | |||
<br> | <br> | ||
The information displayed for each field includes: | The information displayed for each field includes: | ||
| − | *'''Field Name''': The name of the field. Examples include a "Pay To" field for checks, a "User ID" field for ePassporte, and an "Account Number" field for Domestic Wires. | + | *'''Field Name''': The name of the field as it will be displayed within the NATS admin, as well as to Affiliates using this Pay Via Method. |
| − | *'''Type''': Types can either be a text box or a multiple choice list. This is chosen when creating the field. | + | ** Examples include a "Pay To" field for checks, a "User ID" field for ePassporte, and an "Account Number" field for Domestic Wires. |
| + | *'''Type''': Types can either be a text box or a multiple-choice list. This is chosen when creating the field. | ||
*'''Options''': | *'''Options''': | ||
**''Min Length'': The minimum amount of characters for the field. | **''Min Length'': The minimum amount of characters for the field. | ||
**''Value Required'': Marks the field as necessary to be filled in. | **''Value Required'': Marks the field as necessary to be filled in. | ||
| − | **''Check Function'': Checks if the field was properly populated. An example is alnu_letter_space_check, which verifies if the entry is alphanumeric, contains letters, and allows spaces. | + | **''Check Function'': Checks if the field was properly populated. |
| + | *** An example is alnu_letter_space_check, which verifies if the entry is alphanumeric, contains letters, and allows spaces. | ||
**''Max Length'': The maximum amount of characters for the field. | **''Max Length'': The maximum amount of characters for the field. | ||
**''Unique Value Required'': Whether or not the value in the field has to be unique. | **''Unique Value Required'': Whether or not the value in the field has to be unique. | ||
| + | |||
| + | === Editing & Disabling/Enabling a Field === | ||
| + | To edit a field, click the "Actions" button for the field and click "Edit Field". A window will be displayed that allows you to edit the field information. When finished, click "Save changes", and the changes will be set. <br><br> | ||
| + | To delete a field, click the "Actions" button for that field and click "Disable Field". The field will still be in the Fields list, but with a "D" next to its Field Name, meaning that it is a disabled field. | ||
=== Adding a New Field === | === Adding a New Field === | ||
| Line 45: | Line 50: | ||
[[File:Pay-Via-Overview_Fields_Add.jpg|border|300px]]<br><br> | [[File:Pay-Via-Overview_Fields_Add.jpg|border|300px]]<br><br> | ||
When finished, click the "Add" button, and the field will be available to view in the Fields tab. | When finished, click the "Add" button, and the field will be available to view in the Fields tab. | ||
| − | |||
| − | |||
| − | |||
| − | |||
| − | |||
To enable a disabled field, click the "Actions" button for that field and click "Enable Field". That field will now be reenabled. | To enable a disabled field, click the "Actions" button for that field and click "Enable Field". That field will now be reenabled. | ||
Revision as of 14:21, 7 August 2019
This Overview will allow you to view all NATS5 Pay Via Methods's information, create and edit fields, and set up rules.
Details Tab
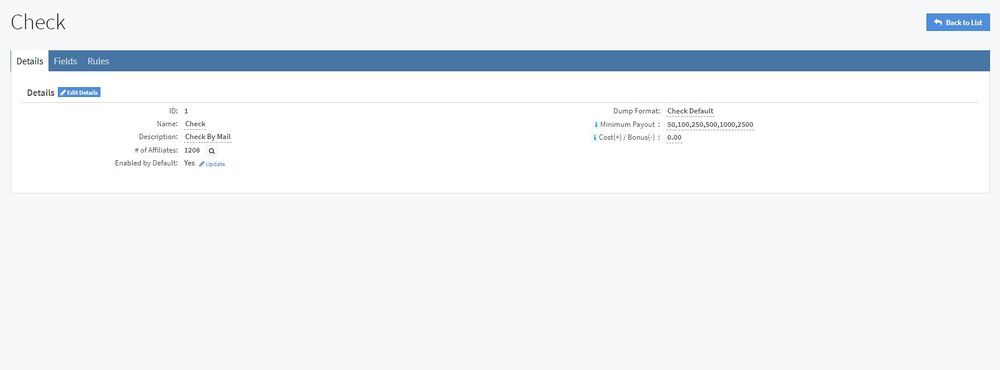
The Details Tab provides detailed information on a specific Pay Via, and allows you to view and edit all of this information. Such information includes:
- ID: The Pay Via ID.
- Name: The name of the Pay Via.
- # of Affiliates: The number of affiliates enabled with this Pay Via Method.
- By clicking the magnifying glass icon next to the number, you will be redirected to the Affiliate Management page, where you can see all of the affiliates enabled with the Pay Via Method.
- Enabled by Default: Indicates whether the Pay Via is available for an affiliate to use by default. This can be changed by clicking the "Update" link next to the field.
- Dump Format: The format you can export payment dumps to for use in a payment processor or accounting program.
- Minimum Payout: A comma separated list of the amounts that affiliates can choose to be their minimum payout.
- Cost(+) / Bonus(-): The amount added/subtracted from the affiliate payout for using this Pay Via Method each time the affiliate is sent a payment.
Fields Tab
Field List
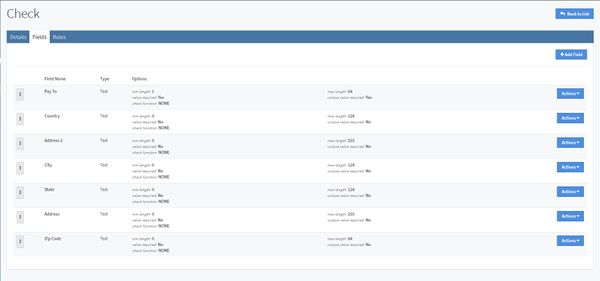
Pay Via Fields refer to information fields where affiliates can fill in any necessary information to receive payments, such as bank account numbers, usernames, etc.
The information displayed for each field includes:
- Field Name: The name of the field as it will be displayed within the NATS admin, as well as to Affiliates using this Pay Via Method.
- Examples include a "Pay To" field for checks, a "User ID" field for ePassporte, and an "Account Number" field for Domestic Wires.
- Type: Types can either be a text box or a multiple-choice list. This is chosen when creating the field.
- Options:
- Min Length: The minimum amount of characters for the field.
- Value Required: Marks the field as necessary to be filled in.
- Check Function: Checks if the field was properly populated.
- An example is alnu_letter_space_check, which verifies if the entry is alphanumeric, contains letters, and allows spaces.
- Max Length: The maximum amount of characters for the field.
- Unique Value Required: Whether or not the value in the field has to be unique.
Editing & Disabling/Enabling a Field
To edit a field, click the "Actions" button for the field and click "Edit Field". A window will be displayed that allows you to edit the field information. When finished, click "Save changes", and the changes will be set.
To delete a field, click the "Actions" button for that field and click "Disable Field". The field will still be in the Fields list, but with a "D" next to its Field Name, meaning that it is a disabled field.
Adding a New Field
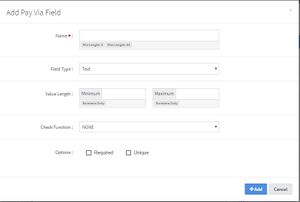
To add a field, click the "Add Field" at the top-right of the tab page. When clicked, a widget will appear, where you will have to fill in the field information mentioned above.

When finished, click the "Add" button, and the field will be available to view in the Fields tab.
To enable a disabled field, click the "Actions" button for that field and click "Enable Field". That field will now be reenabled.
Rules Tab
The Rules tab contains all of the rules set for your Pay Via. You can choose to enable, disable, or ignore your Pay Via for specific target affiliates and countries.
To add a new rule, click the "Add New" button at the top-right of the tab. You can enter target affiliates and countries that you would like to specifically enable, disable, ignore by choosing the type from the drop-down list.
To edit a rule, click the "Actions" button and click "Edit This Rule". Once you edit a rule, that old rule that was edited over will still be available in the table, but with an "IGNORE" type and an "Expired" status. This can be viewed by clicking the filter button, which is the first button to the right of the search bar. You can choose to view Enabled Rules, Disabled Rules, and/or Ignore Rules.
To remove a rule, click the rule's "Actions" button and click "Remove This Rule". That rule will now have an "IGNORE" type and an "Expired" status.


