NATS4 Sites Admin
The Sites Admin lets you manage your sites.
The Sites list shows information about each site. The Edit Site Tour drop-down lets you edit a tour; see the Tours section below. Right of each site are several action icons:
- The Edit Site Details icon edits the site's details. For more information, see the Site Setup article.
- The Add New Tour icon adds a new tour
- The Set Join Options icon lets you add or remove join options for all tours on this site.
- The Set Active Programs icon changes which programs this site belongs to
- The Edit Site Partners icon lets you add site partners to this site. For more information, see Site Partner article
- The Edit Site Templates icon lets you modify the site templates. For more information, see The Sites Admin Templates article
- The Delete Site icon deletes a site
Note: NATS hides particular icons for sites that don't use them.
Site Tours
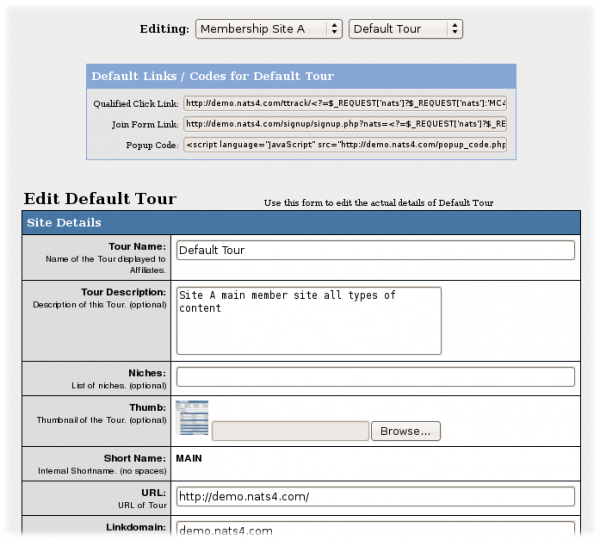
Most site configuration occurs on its tour. Use the Edit Site Tour drop-down to select a tour and click Edit.
Each tour uses the Default Tour's configuration until you modify that specific tour's settings. Most of the settings are self-explanatory or have useful explanations next to them, but for more information, see the Site Setup article.
Biller Details
Activate the billers for this tour by entering their tour-specific settings in the Biller Details section.
Join Options
You add join options by clicking Setup Additional Options for this Site. There are three check boxes:
- The Free Pre checkbox lets you add a join option that starts with a free trial
- The No Old Members checkbox lets you forbid previous members from using the free trial again
- The All Tours puts this option on all of this site's tours
Warning: You must setup a free trial period on your site before enabling the Free Pre checkbox.
Excluding Billers from Join Options
In the Sites Admin, edit a tour, edit a Join Option, and remove information for billers you don't want to use. Billers without information won't be used.
Join Options Order
Cascades are listed in alphabetical order on the join form. To re-order the options, rename the cascades.
Hiding Join Options from Old Members
On the Sites Admin, edit the tour with the join options you want to hide. When adding a new join option (or editing an old one), check the No Old Members checkbox to hide this join option from old members
Removing Join Options
Go to Sites Admin, edit a tour, scroll to the bottom, click the Setup Additional Options For This Site link, find the join option you want to remove, and click the Delete icon.
Adding Extra Site Tours
You can promote multiple tour URLs for you site
Go to the Site Admin, find the site, and click the Add Tour button. Enter a Shortname and click Ok. On the next screen, enter the new tour's required information. Fields with a red asterisk next to them differ from the default tour. Any field that doesn't differ from the default tour will use the default tour's settings.
Affiliates can now get linkcodes for this from the affiliate linkcodes page.
Emailing Site Members
NATS can send members email when they join, cancel, credit, chargeback, rebill, and on other criteria.
Note: NATS will not send email unless you set the EMAIL_TO_OWNER setting on the Emails page of the Configuration Admin
Go to the Sites Admin, edit a tour, and find the Emails Settings section. Fill in the blank boxes with the email subject to send; this enables the email. Click the Save button.
The change the email body, click the Edit Template icon below the subject box.
To disable an email, remove the subject and click Save.
Tour Setup
NATS works with any tour: just at the following PHP code to the end of every hyperlink URL on the tour:
?<?=$_SERVER['QUERY_STRING]'?>
This code sends the affiliate's linkcode from the tour page to the join page. You also need to ensure that the your tour ends with the NATS pre-join page.
Undeleting Sites
Go to Sites Admin and click the link that says, "Click Here to Show Deleted Sites." Click the undelete icon to undelete a site from this list.


