Affiliate Account Details
Note: This article only applies to NATS version 4.1 and higher. If you wish to upgrade your installation of NATS in order to take advantage of this feature, please put in a support ticket.
Having up-to-date affiliate account details, such as contact information and payment details, can be very important. Without having these details stored in NATS, your account representative, program owner, or any other admins will not be able to contact you if necessary.
All of your account information can be seen and edited on the Affiliate Account Details page, which can be found in the "My Account" section in the toolbar at the top of every affiliate page in NATS4.1. Mouse over "My Account," and click the Account Details link in the pop-down menu that appears.
The Account Details page contains all of the information that you provided when signing up for your NATS Installation. This includes your name, address, various contact information, payment details, W9 information, and password.
Some NATS installations may require e-mail or administrator verification before changes to your account details can be saved. This is decided by the NATS program owner.
Editing Your Account Details
You can change any of the information displayed on this page by simply clicking the "Modify" button in the top-right corner of the section you wish to edit. You'll find five separate sections in this page, each of which contain essential user information.
Account Details
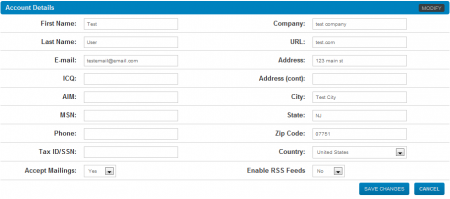
The Account Details section contains the basic account information that you provided when signing up for this NATS program. The information stored here includes your first and last name, address, company, e-mail address, AIM/ICQ screen name, phone number, and tax ID/social security number (required for certain payment types). You can also choose whether or not you want to accept mailing sent by NATS here, and choose if you want to enable RSS Feeds.
To edit the information shown here, simply replace the information in the field you wish to edit with your new, updated information. Click “Save Changes” once you have finished making your desired changes to update your affiliate information.
Payment Details
The Payment Details section contains all of the information necessary to receive payments that are tracked through NATS. NATS supports a wide variety of payment options, many of which require different identification information.
Use the "Payment Method" drop-down menu to choose the payment type you want to edit your information for. You can use this to edit information for checks, domestic wires, ePassporte, and any other payment option supported by NATS and offered by your program owner. Once you select your desired payment method, you will be able to update the required information as you wish. This can include information such as a "Pay To:" name, address, account numbers, bank names, user IDs, etc.
You can also use the "Minimum Payout" drop-down menu in this section to change the minimum payout amount you must reach before a payment can be made to you. These choices are defined by the program owner, who can offer as many or as few choices as they wish.
Once you have made all of your desired changes and updates to your Payment Details, click "Save Changes" to updated the displayed information.
W9 Information
The W9 Information section allows affiliates to upload a W9 form for the program owner, which provides the program owner with the tax information necessary to make payments to affiliates.
Use the link provided in the "IRS Form" field to download a blank version of the W9 form. This form must be downloaded and filled out by the affiliate, who must then upload the completed version to the NATS server.
To do so, just click the "Choose File" button found in the "Your Form:" field, find the completed W9 form on your hard drive, and then click Open. Once you do this, NATS will upload your W9 form to the server, making it available to the NATS program owner to download and store for their records. Once you have uploaded your completed W9 form, click "Save Changes."
Password
If you decide to change your NATS log-in password for any reason, you can update your password in this section. Just click “Modify” in the top-right corner to do so.
Enter your current log-in password in the “Current Password” field, then enter your desired new password in the “New Password” field. Enter your new password one more time in the “Verify Password” field to ensure that you did not make any typing mistakes, then click “Save Changes” to update your NATS password.
Avatar
This section allows you to add, modify, or update your NATS affiliate avatar, which can be used to quickly identify your account and add a personalized touch to your NATS interactions. Just click "Modify" to do so.
Click the "Browse For Image" button in the bottom-right corner of this section to upload a new avatar to NATS. Choose an image file from your hard drive to use, then click "Open." Your new avatar image will now be displayed in this section, along with the source image you chose from your hard drive.
Use the box overlaid on top of your source image to crop your avatar to the specifications you want. Just click and drag the edges of the highlighted box to fit your desired avatar -- you will see the avatar preview automatically update itself once you release the edges. Use this to ensure that your avatar is correctly displayed before you save it.
Once you are satisfied with the changes you have made, click “Save Changes,” and your new NATS4.1 affiliate avatar will be saved.


