Customize Join Form
Note: This article only applies to NATS version 4.1 and higher. If you wish to upgrade your installation of NATS in order to take advantage of this feature, please put in a support ticket.
The Quick Join Form is a new feature in NATS 4.1, which allows you to quickly and easily perform a basic customization of any of your tour join forms, based off of the NATS default join form.
You can use the Quick Join Form to customize your join forms within the Edit Tour section of the Sites Admin, instead of having to individually edit your templates in the Skins and Templates Admin.
The Quick Join Form only allows you to edit the text of your NATS join forms, however. If you wish to edit the look and feel of your join form, click the "Edit Site Templates" action icon on the Sites Admin main page and edit your join template with the necessary code.
Finding the Quick Join Form
If you wish to use the NATS 4.1 Quick Join Form to quickly customize the join forms for any of your sites, go to the Sites Admin and locate the site you want to edit the join form for in the "Active Sites" table on the page.
Once you've found the site you want to customize, edit one of your tours, or create a new tour to use your join form with by clicking either "Edit" or "Add New Tour".
Editing Your Join Form
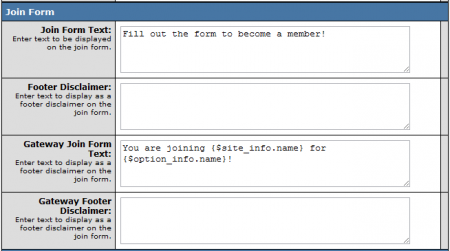
Once you're on the "Edit Tour" page, locate the "Join Form" section of the page. You'll see various blank fields here, which let you define the text you want to display on your customized join form.
The available fields consist of:
- Join Form Text - Enter the text you want to display to your members at the top of your join form, in order to get them to sign up.
- Footer Disclaimer - Enter a disclaimer for your members, to be displayed in the footer of the join form.
- Gateway Join Form Text - Enter the text you want to display at the top of your gateway join form, in order to get them to sign up.
- Gateway Footer Disclaimer - Enter a disclaimer for your members, to be displayed in the footer of the gateway join form.
Fill in the provided fields here with the text that you want to display to your members. Each available field in this section accepts Smarty variables and other code you may want to use on your join form, much like editing the form's template itself through the Skins and Templates Admin.
The Gateway Join Form Text and Gateway Footer Disclaimer will be used for join forms for gateway billers, while the standard join form text and footer disclaimer will be used for all other billers.
Save your changes once you have finished customizing your join form text. Your affiliates will now be able to promote your sites and tours with your custom join form by grabbing linkcodes from the Affiliate Linkcodes page.
