Difference between revisions of "TubeStudio Bulk Import"
| (16 intermediate revisions by one other user not shown) | |||
| Line 1: | Line 1: | ||
| + | {{TubeStudio Manual | ||
| + | | show_video_admin_section= true | ||
| + | }} | ||
| + | In TubeStudio it is possible to upload many videos at once. This is accomplished by using the bulk import feature. This page will help you get familiar with using this feature so that you can easily upload a large number of videos at once. To specify the list of videos that you wish to import you give TubeStudio either a CSV or XML file. If you are unfamiliar with these formats please see these articles on Wikipedia. [http://en.wikipedia.org/wiki/Comma-separated_values CSV] [http://en.wikipedia.org/wiki/Xml XML] | ||
| + | == How to Bulk Import Videos == | ||
| + | To get started bulk importing videos first go the the Videos Admin.[[File:videos_admin.png]]<br> | ||
| + | Go to the bulk importing page by clicking on the Bulk Import Videos tab. [[File:bulkimport_tab.png]]<br> | ||
| + | |||
| + | Here you will have the option to choose the dump format you want to use for the bulk import. | ||
| + | |||
| + | Choose either to use CSV or XML by using the drop down at the top of the page.<br><br> | ||
| + | [[File:import_type.png]]<br><br> | ||
== CSV Import == | == CSV Import == | ||
| + | If you choose to use CSV this is the page that will display:<br><br> | ||
| + | [[File:bulkimport_csv.png | 858px]] | ||
| + | |||
| + | Below is an explanation of each of the options on this page:<br> | ||
| + | |||
| + | '''Separator'''<br> | ||
| + | Here you can choose how to separate values in your CSV file by entering the separator in the box at the top.<br> | ||
| + | |||
| + | '''Unscheduled'''<br> | ||
| + | Select this box if you do not have a specific date that you want this video to be active.<br> | ||
| + | '''Constant Fields'''<br> | ||
| + | These options will apply to all videos uploaded using this CSV dump.<br> | ||
| + | :''Sponsor Site''<br> | ||
| + | ::If you have a sponsor that provides your content and you want to upload multiple videos from them select the sponsor here and it will be applied to all the videos in this CSV dump.<br> | ||
| + | :''Channels'' | ||
| + | ::Select the channels that you would like all of your bulk upload videos to appear on.<br> | ||
| + | '''Dynamic Fields'''<br> | ||
| + | Select each of the fields that you would like to apply to the CSV in the order that they appear in the file.<br> | ||
| + | For example, if your values are:<br> | ||
| + | newVideo.wmv, newVideoThumbnail.jpeg, My New Video, This is my new video. | ||
| + | Then select:<br> | ||
| + | ''file''<br> | ||
| + | ''image''<br> | ||
| + | ''title''<br> | ||
| + | ''description''<br> | ||
| + | from the drop down boxes.<br> | ||
| + | If you would like to have more fields click the Add Fields button. This will let you add an unlimited number of fields.<br> | ||
| + | Finally you can copy and paste you CSV dump in the center box. Once you have done this you can click the Import Videos button. | ||
== XML Import == | == XML Import == | ||
| + | You can also bulk import videos using an XML dump. To do this select XML from the import type drop down at the top of the page.<br> | ||
| + | [[File:bulkimport_xml.png| 858px]]<br> | ||
| + | |||
| + | Below is an explanation of each of the options on this page:<br> | ||
| + | |||
| + | '''Separator'''<br> | ||
| + | Here you can choose how to separate values in your CSV file by entering the separator in the box at the top.<br> | ||
| + | |||
| + | '''Unscheduled'''<br> | ||
| + | Select this box if you do not have a specific date that you want this video to be active.<br> | ||
| + | |||
| + | Below is the format for the XML file to bulk import videos.<br> | ||
FORMAT | FORMAT | ||
| Line 34: | Line 86: | ||
<videos> | <videos> | ||
| − | </pre> | + | </pre><br> |
| + | |||
| + | To specify constents to be applied to all your videos place all the fields that you want to be constatns and their values in between a pair of <constants> </constatns> tags. | ||
| + | |||
| + | For example: | ||
| + | <constants> | ||
| + | <file>http://www.example.com/</file> | ||
| + | </constants> | ||
| + | |||
| + | will fetch all of your videos from example.com.<br> | ||
| + | |||
| + | Each video goes in between a set of <video> </video> tags. | ||
| + | Then you can specify fields for that video such as title using <title> </title> tags.<br> | ||
| + | |||
| + | The general format is <field>"field value"</field>.<br> | ||
| + | |||
| + | Below is a typical example of how your XML dump should be formatted.<br> | ||
EXAMPLE: | EXAMPLE: | ||
| Line 76: | Line 144: | ||
<tags> tag1, tag2, tag17, tag4, ... </tags> | <tags> tag1, tag2, tag17, tag4, ... </tags> | ||
</video> | </video> | ||
| − | <videos> | + | </videos> |
</pre> | </pre> | ||
Latest revision as of 05:55, 13 April 2010
TubeStudio
|
|---|
In TubeStudio it is possible to upload many videos at once. This is accomplished by using the bulk import feature. This page will help you get familiar with using this feature so that you can easily upload a large number of videos at once. To specify the list of videos that you wish to import you give TubeStudio either a CSV or XML file. If you are unfamiliar with these formats please see these articles on Wikipedia. CSV XML
How to Bulk Import Videos
To get started bulk importing videos first go the the Videos Admin.![]()
Go to the bulk importing page by clicking on the Bulk Import Videos tab. ![]()
Here you will have the option to choose the dump format you want to use for the bulk import.
Choose either to use CSV or XML by using the drop down at the top of the page.
![]()
CSV Import
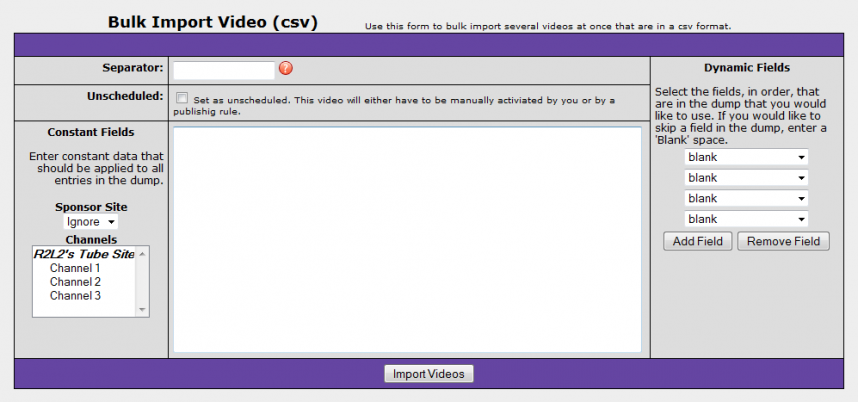
If you choose to use CSV this is the page that will display:

Below is an explanation of each of the options on this page:
Separator
Here you can choose how to separate values in your CSV file by entering the separator in the box at the top.
Unscheduled
Select this box if you do not have a specific date that you want this video to be active.
Constant Fields
These options will apply to all videos uploaded using this CSV dump.
- Sponsor Site
- If you have a sponsor that provides your content and you want to upload multiple videos from them select the sponsor here and it will be applied to all the videos in this CSV dump.
- If you have a sponsor that provides your content and you want to upload multiple videos from them select the sponsor here and it will be applied to all the videos in this CSV dump.
- Channels
- Select the channels that you would like all of your bulk upload videos to appear on.
- Select the channels that you would like all of your bulk upload videos to appear on.
Dynamic Fields
Select each of the fields that you would like to apply to the CSV in the order that they appear in the file.
For example, if your values are:
newVideo.wmv, newVideoThumbnail.jpeg, My New Video, This is my new video.
Then select:
file
image
title
description
from the drop down boxes.
If you would like to have more fields click the Add Fields button. This will let you add an unlimited number of fields.
Finally you can copy and paste you CSV dump in the center box. Once you have done this you can click the Import Videos button.
XML Import
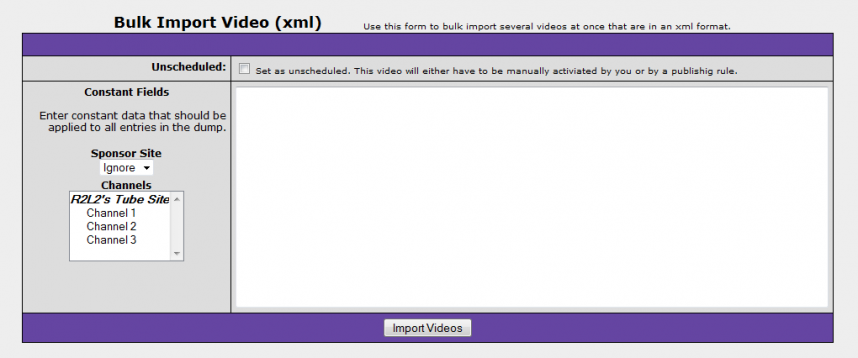
You can also bulk import videos using an XML dump. To do this select XML from the import type drop down at the top of the page.

Below is an explanation of each of the options on this page:
Separator
Here you can choose how to separate values in your CSV file by entering the separator in the box at the top.
Unscheduled
Select this box if you do not have a specific date that you want this video to be active.
Below is the format for the XML file to bulk import videos.
FORMAT
<videos>
	<constants>
	  ... enter any field from <video> here to have it apply to all video entries.  If the field is also in a video, it will be overwritten by that field.
	</constants>

	<video>
		<file> URL TO FETCH VIDEO </file>
		<sample_thumb> URL TO SAMPLE THUMB </sample_thumb>
		<title> VIDEO TITLE </title>
		<description> VIDEO DESCRIPTION </description>
		<summary> VIDEO SUMMARY </summary>
		<link> SPONSOR LINK </link>
		<link_name> SPONSOR LINK NAME </link_name>
		<channels> CHANNEL 1 </channels>
		<channels> CHANNEL 2 </channels>
		<channels> CHANNEL 3 </channels>
		<tags> tag1, tag2, tag3, tag4, ... </tags>
		<unscheduled> 0 OR 1 </unscheduled>
		<priority>1 TO 100</priority>
	</video>
<videos>
To specify constents to be applied to all your videos place all the fields that you want to be constatns and their values in between a pair of <constants> </constatns> tags.
For example:
<constants>
   <file>http://www.example.com/</file>
</constants>
will fetch all of your videos from example.com.
Each video goes in between a set of <video> </video> tags.
Then you can specify fields for that video such as title using <title> </title> tags.
The general format is <field>"field value"</field>.
Below is a typical example of how your XML dump should be formatted.
EXAMPLE:
<videos>
	<constants>
		<priority>50</priority>
		<link>http://my_sponsor_site.com/</link>
		<link_name> My Sponsor Site</link_name>
		<unscheduled>1</unscheduled>
	</constants>

	<video>
		<file>http://my_sponsor_site.com/videos/video1.wmv</file>
		<sample_thumb>http://mysite.com/videos/video1.jpeg</sample_thumb>
		<title>Video 1</title>
		<description>This is my 1st video</description>
		<channels> Channel 1 </channels>
		<channels> Channel 2 </channels>
		<channels> Channel 3 </channels>
		<tags> tag1, tag2, tag3, tag4, ... </tags>
	</video>
	<video>
		<file>http://my_sponsor_site.com/videos/video2.wmv</file>
		<sample_thumb>http://mysite.com/videos/video2.jpeg</sample_thumb>
		<title>Video 1</title>
		<description>This is my 2nd video</description>
		<channels> Channel 1 </channels>
		<channels> Channel 4 </channels>
		<channels> Channel 2 </channels>
		<tags> tag9, tag2, tag3, tag1, ... </tags>
	</video>
	<video>
		<file>http://my_sponsor_site.com/videos/video3.wmv</file>
		<sample_thumb>http://mysite.com/videos/video3.jpeg</sample_thumb>
		<title>Video 3</title>
		<description>This is my 3rd video</description>
		<channels> Channel 6 </channels>
		<channels> Channel 2 </channels>
		<channels> Channel 2 </channels>
		<tags> tag1, tag2, tag17, tag4, ... </tags>
	</video>
</videos>